Table of Contents
- Downloading
- Historical Note
- Introduction
- Main Menu
- Getting Started
- Options Menu
- Options/executables
- Options/midi player
- Options/font
- Options/button style
- Options/character coding
- Options/use abc header
- Main Features
- Play Option Menu
- Play Option Menu/use midi header
- Play Option Menu/ tempo pitch
- Play Option Menu/ arrangement
- Play Option Menu/ drumkit
- Play Option Menu/ advanced
- Play Option Menu/ voices
- Play Option Menu/ random voice arrangement
- Display options
- Abcm2ps options
- Abc2svg
- Utilities menu/Abc2abc user interface
- Utilities menu/ Gchords/drums to voice
- Utilities menu/ Gchords only
- Utilities menu/ Reformat
- Utilities menu/ Multivoice extraction functions
- Utilities menu/ Drum Tool
- Utilities menu/ Pitch Histogram
- Utilities menu/ Pitch Interval Histogram
- Utilities menu/ Chordgram
- Utilities menu/ Notegram
- Utilities menu/ Save sheet music as ps
- Utilities menu/ Save sheet music as pdf
- Utilities menu/Split abc file
- Utilities menu/ copy
- Utilities menu/ Incipits
- Edit Menu/Edit File
- Edit Menu/Edit Selection
- Edit Menu/TclAbcEditor
- Edit Menu/TclAbcEditor - Chords
- Edit Menu/TclAbcEditor - Grace Notes
- Edit Menu/TclAbcEditor - Tools
- Live Editor
- Edit Menu/ MultiVoicedEditor
- Edit Menu/ ABCarus
- AbcTranscriptionTools
- Export to Muscore
- Internals
- Internals/messages
- Internals/view X.tmp file
- Internals/save X.tmp as an abc file
- Internals/midi2abc of output file
- Internals/mftext of output file
- Midinotes of output midi file
- Midicsv of the output midi file
- Internals/contents of runabc_home
- Internals/bar line alignment
- Search Menu/Find Title
- Search Menu/Find Bars
- Bar Matching Configuration
- Search Menu/Match Tune
- Search Menu/Grouper
- Search Menu/Histogram Matcher
- Midi Menu / midisummary
- Midi Menu / abc notation
- Midi Menu / midi2abc
- Midi Menu / midi file description
- Midi Menu / midi2abc options
- Midi Menu / midi structure
- Midi Menu/ Piano Roll Representation
- Velocity Distribution
- Velocity Map
- Pitch Distribution
- Pitch Class Distribution
- Notegram
- Chordgram
- Onset Distribution
- Note Duration Distribution
- Beat Graph
- Pgram
- Midi Menu/ Drum Events - Piano Roll Representation
- Midi Menu/ Mftext - Textual Representation of MIDI file
- Musicxml support
- Installation Notes
RunABC
Recent Updates Applying to Versions 2.392 and Higher
Like midi files runabc supports functions to deal with with musicxml files. Using Wim Vree's python code, you can convert abc files to musicxml files and vice versa.
I added a short video on how to use the grouper function here
Many things have been happening in the abc music notation community. First, there is a shift to running the software using JavaScript code rather than executables produced by C compilers. One of the advantages of using JavaScript, is that the software can be run inside any internet browser on any system - Windows, Linux, and Mac. Check out the web sites https://michaeleskin.com/abctools/abctools.html and https://abctosheet.my.to/.
Recently Avik Topchyan has released ABCarus which is based on Jef Moine's abc2svg JavaScript library. ABCarus runs on all major platforms and contains a nice user interface to navigate through your collection of abc files. Runabc.tcl was upgraded to contain a link to his software. The interface is accessed through one of the edit menu items.
James Allwright (the original developer of abc2midi, abc2abc, yaps, midi2abc, and mftext) has released a new version of version of abc2midi now called abc2midiu https://sourceforge.net/projects/abc2midiu/. He has also replaced abc2abc with toadflax https://sourceforge.net/projects/toadflax/ which comes with its own user interface.
To deal with these changes, there have been minor additions to the Options menus, Internals menu and Midi menu. You also need to ensure that you are running the latest versions of midi2abc and abc2midi. The changes include putting the link to abc2midi in a separate line in the Options/ABC Executables frame rather than including it inside the abcmidi folder. There is also an option to link to midicsv, a separate midi editing tool produced by John Walker https://www.fourmilab.ch/webtools/midicsv/.
The Internals menu (icon to the left of the magnifying glass) has been extended to make it easier to examine the operation of abc2midi or abc2midiu. You can now save the mftext output to a text file. There are new functions such as midinotes and midicsv, which are valuable for tracking problems with the output midi file produced by abc2midi or abc2midiu.
Note that on Windows 11 you may encounter the message MSVCR100.dll not found when you attempt to run any of the abcmidi executables. In that case you need to install the Visual C++ redistributable 2010 package.
The utilities menu now includes chordgram and notegram allowing you to view the chordgram or notegram for a particular tune.
Runabc now supports Jef Moine's abc2svg javascript package. This means that it is now possible to render and play a tune in an abc file without resorting to the executables abc2mps or those part of the abcMIDI package. The javascript library can reside on your system or you can link to the library on the internet. It is still recommended that you still acquire abcm2ps the abcMIDI executable to run some of the other features of this program.
Downloading
Though runabc is also available on sourceforge.net in the "ABC Music Project", the most recent version is available on my site on https://ifdo.ca/~seymour/runabc/top.html.
Historical Note
Runabc.tcl was developed more than 15 years ago when the computer technology was a lot different. At that time, abc music notation was just introduced, and it was an important music notation language. Computers did not have more than 40 megabytes of hard drive space. MPEG did not introduce mp3 audio files. Microsoft wav files was the principle way of playing audio, and the wav files were very big. Midi files were already introduced and were an alternative to playing music. C was a popular computer language, supplanting Fortran, Basic, and Pascal. C++ was just being introduced. Tcl/Tk and Perl were popular interpreter languages. Screen space on your monitor was at a premium as the standard dimensions were 640 by 400.Today the situation is very different. Python and JavaScript are now the most popular computer languages. Tcl/Tk seems to be going the same way as Turbo Pascal and Fortran; however, the language is still alive and there are a few developers using that language. The abc music notation standard has strong competition from the musicxml standard. Other music notation systems such as Sibelius and Finale are losing support. Mp3 files provide better audio reproduction than midi files, and they are about 20 times more compact than the Microsoft wav files. Computer hard drives typically can hold a half a terabyte of space. The internet runs much faster.
Runabc which has been around for a long time shows many characteristics of its age. The program tends to save on screen space by using the same area for different configurations and controls. The program relies on a separate visible folder for saving its configuration and storing some temporary files. This folder is called runabc_home. The location of this folder can be given by an environmental variable called RUNABC_HOME. (On more modern systems, this folder would be hidden by placing a dot in front, such as .runabc.) Windows 11 has a folder called AppData with subfolders called roaming, locallow and local. To protect the user from doing any damage to the operating system, the File Explorer hides this folder as well as Program Files and Prograrm Files (x86). You need to configure the File Explorer if you wish to make these folders visible. Introducing or modifying any of the environmental variables is now more complicated.
Runabc depends on several external executables that were developed by James Allwright included in the AbcMIDI package. This package has numerous security and memory issues and is no longer supported by James. Since then he has introduced new packages which are more bulky. I have been supporting abcMIDI and introduced new applications such as midicopy, midistats, and abcmatch. The code is not perfectly clean by today's standard. Jef Moine supported abc2mps in the days when PostScript files were the main method of displaying graphic information such as sheet music. The PostScript standard has now been supplanted by SVG files. Jef Moine created the abcsvg JavaScript library to replace abcm2ps, and he has stopped supporting abc2mps.
There have been other changes to the abc software landscape. Nils Liberg developed EasyABC and then transfered support to me. EasyABC is written in Python2 and uses svg files for displaying the music scores. Unfortunately Python2 was being replaced by Python3. There were several other developers who have managed to keep EasyABC going.
Now there are newer applications such as ABCarus and AbcTranscriptionTools which have many of the early features of EasyABC as well as many more. Runabc was upgraded to link with these new applications. The process of installing all these new applications and configuring runabc to these applications makes the setup more complicated.
Introduction
Runabc is a graphic user interface to the abcMIDI, abc2svg and abcm2ps and many other packages which have been developed by other programmers. Many of these programs run in a command window using commands like
abcm2ps sample.abc -P -X -O out.ps
and then calling another program to view the postscript file.
The other programs may reside in other directories and have
complicated run time parameters. Runabc allows you to run
these executables without going to a command window, and
also remembers the runtime parameters that you prefer.
In order to use runabc, you need to download and install numerous programs and packages. The key programs are found in abcMIDI package consisting of 7 modules; abc2abc, abc2midi, abcmatch, mftext, midi2abc, midicopy, and yaps.
Since the inception of runabc, the number of packages that you require has grown. There are links to new programs such as ABCarus, Muscore, abctranscriptiontools, abc2xml and xml2abc which have their own user interface. There is a large choice of applications to play midi files. In order to get runabc fully operational you need to download and install numerous programs and then indicate the paths to these executables. In addition, a python interpreter is also needed. Web links to these programs our found under the help menu. Many of these applications, in particular the ones playing midi files, only run on the Windows PC. If you installing runabc on Windows using the setup file, then many of the core programs will automatically be included; however, not all of the applications are there.
There have been many changes to the abc notation software environment during the past 15 years. SVG (scalable vector graphics) files have replaced the PS (Postscript) files. A lot of the old software such as abcm2ps, abcMIDI are no longer supported by the original developers. The old software has now been replaced by other packages running in new computer languages such as JavaScript and Python. Many of these applications are called automatically from a web site. You now need to link runabc to an internet browser such as Chrome, Firefox or the Windows Edge browser. On the Linux operating system, you will need to install Python in addition to Tcl/Tk.
Besides providing the basic functions for editing an abc file, the program has many other features. You can play the tune at any tempo or key or assign different musical instruments without modifying the original file. You can easily add drum accompaniment. The built in editor has functions for adding harmony, adding guitar chords or grace notes, removing redundant guitar chords, and aligning the bars. You can search your entire collection of abc tunes for a tune with a specific word or words in the title. You can perform the search on a melody fragment. Given a specific tune, you can search for other tunes which share similar motifs. You can expand a single voiced file with guitar chords and drum accompaniment into a multivoiced file.
Many abc tunes are grouped together into a single file. Runabc allows you to order the tunes by name, key signature, time signature, or X: reference number.
Runabc also provides many analysis tools for MIDI files. You can view the MIDI file in piano roll form and clip out a particular section of the MIDI file. You can view the MIDI commands in textual form and filter out the commands which are of lesser interest. There is a graphical user interface to midi2abc a program which is used to convert a MIDI file to an abc file. Midi2abc has many runtime parameters which is somewhat complicated to use without a user interface.
Runabc provides contextual help. This means that when you click the help button, (the button with a "?"), the text displayed contains information relevant for the particular functions you are using.
Runabc has been expanding over the past 22 years that it has been available. This guide alone is over 60 pages long when formatted into a pdf file. In fact runabc could be broken into at least four separate programs where each program addresses a particular type of user. The midi analysis section of runabc has been expanded and is now part of a separate application called midiexplorer. community.
If runabc were split into several programs here is how it could be done.
abccore: this would consist of a program for editing, converting a selected abc tune to MIDI or PostScript format, listening to the tune and rearranging the instruments, displaying the tune in common music notation and controling the format. The editor is very powerful and contains modules for adding guitar chord accompaniment, adding harmony, aligning bar lines in the abc representation, removing redundant guitar chords, removing all guitar chords, removing grace notes and etc.
midianalyzer: this would consist of a program to display the midi file in piano roll format, to display the midi file in text format, to convert the midi file to abc format, to analyze the drum channel, and to extract some statistical patterns.
abcutilities: this would consist of a program for transposing the tune to another key signature, to extract a particular voice, to expand the guitar chords into a separate music line or abc voice, to add a separate voice for the drum channel, to reformat or reorganize the abc representation, and to create a file of incipits.
abcanalyzer: this would consist of a program for searching a large collection for tunes containing certain key words in the title, for certain musical bars or measures, for identifying groups of tunes containing common features, for matching a tune to other similar tunes, and for analyzing the tonality of the tune (minor, major, dorian, pentatonic, and etc.).
Breaking up the program would entail more work as there would be have four applications to maintain, document and distribute. Furthermore this is less efficient in terms of memory space utilization. The size of each program as an executable would be almost as large as runabc.exe since most of the code consists of the tcl/tk interpreter and support function.
Runabc is a script written in tcl/tk 8.5 or 8.6. This is a scripting language like Java, Perl, Ruby, Python, Basic and many more. To run this script, you need to install the Tcl/Tk interpreter on your computer; however, fortunately for the PC and some other systems, the Tcl/Tk interpreter and runabc.tcl script can be packaged together into one executable less than two megabytes. The Tcl/Tk interpreter, is available for many systems including the Mac. This means that the program runs on the PC, on the Mac, on Linux, and many Unix based operating systems. Runabc does not run alone but also requires the abcMIDI executables, a MIDI player and a PostScript or PDF file viewer.
Runabc.tcl no longer works properly with older versions like Tcl/Tk 8.3. To tell which version you are running, type in the command info tclversion while you are in the wish or tclsh command console.)
Unless you are installing runabc on windows with the setup_runabc.exe, it is not a trivial matter to get all the components and link them to the program. (See install.html for more details).
Note the appearance of the windows shown here may differ depend on operating system you are using as well as the font thay you select.
Runabc saves its state in a initialization file called runabc.ini. Thus when the program is restarted, it opens the last abc file that you were viewing and all the user preferences. is updated each time you exit runabc. Runabc.ini is a regular text file which is stored inside a special folder called runabc_home. The file that can be viewed and edited using any text editor; however, with few exceptions (which are noted in this documentation) all the parameters can be modified using the runabc.tcl user interface. If you delete runabc.ini, then runabc will restart with its factory setting as if you are running the program for the first time.
There are more than 370 parameters that are stored in runabc.ini. The most important variables are the locations of the external programs that are called by runabc.tcl. For example on my Windows system they look like this.
path_ABCarus C:/Users/fy733/AppData/Local/Programs/abc-electron-proto/ABCarus.exe
path_abc2abc C:/Users/fy733/OneDrive/Documents/abc/tcl/abcmidi_win32_mingw64/abc2abc.exe
path_abc2midi C:/Users/fy733/OneDrive/Documents/abc/tcl/abcmidi_win32_mingw64/abc2midi.exe
path_abc2xml C:/Users/fy733/OneDrive/Documents/abc2xml_268/abc2xml.py
path_abcm2ps C:/Users/fy733/OneDrive/Documents/abc/tcl/abcmidi_win32_mingw64/abcm2ps.exe
path_abcmatch C:/Users/fy733/OneDrive/Documents/abc/tcl/abcmidi_win32_mingw64/abcmatch.exe
path_editor C:/Program Files (x86)/Vim/vim90/gvim.exe
path_gs C:/Program Files/gs/gs10.00.0/bin/gswin64.exe
path_internet C:/Program Files (x86)/Microsoft/Edge/Application/msedge.exe
path_midi2abc C:/Users/fy733/OneDrive/Documents/abc/tcl/abcmidi_win32_mingw64/midi2abc.exe
path_midicopy C:/Users/fy733/OneDrive/Documents/abc/tcl/abcmidi_win32_mingw64/midicopy.exe
path_midiplayer_1 C:/Program Files/Windows Media Player/wmplayer.exe
path_midiplayer_2 C:/Program Files/MuseScore 4/bin/MuseScore4.exe
path_midiplayer_3 C:/TiMidity++-2.15.0/timw32g.exe
path_midiplayer_4 C:/Program Files/MPC-BE/mpc-be64.exe
path_midistats C:/Users/fy733/OneDrive/Documents/abc/tcl/abcmidi_win32_mingw64/midistats.exe
path_muscore C:/Program Files/MuseScore 4/bin/MuseScore4.exe
path_otherps jcabc2ps
path_xml2abc C:/Users/fy733/OneDrive/Documents/xml2abc_177/xml2abc.py
path_yaps C:/Users/fy733/OneDrive/Documents/abc/tcl/abcmidi_win32_mingw64/yaps.exe
Main Menu

The main menu consists of a row of buttons as follows
- TOC -- table of contents
- Edit menu
- Utilities
- Play selection
- Play option menu
- Abc to PS options
- Display music
- Live editor
- Internals (formerly Console)
- Search menu
- Midi menu
- Options menu
- Help
- Quit
The rest of the document, describes the functions associated with the menu buttons; but here is a short overview.
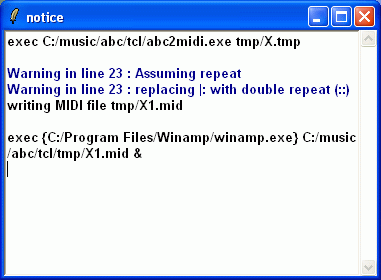
The key functions of runabc are displaying the music in common music notation, converting it to a MIDI file and playing it, and editing the it. Runabc performs these functions by means of external programs. When you click the Display music button, runabc finds the tune in the collection and creates a temporary file of just this tune. Next it calls a abc to PostScript converter like abcm2ps to convert this temporary file to a PostScript file (usually called Out.ps). Finally, runabc calls a PostScript file viewer to show this file on the screen. You can see all of these actions in a separate window by clicking on the Internals/messages. For example,
exec /home/seymour/abc/abcm2ps  X.tmp  -s 1.0  -a 1 -m 1cm  -w 20cm   -d 50 -j 1 -c

abcm2ps-8.14.2 (2018-12-18)
File X.tmp
Output written on Out.ps (1 page, 1 title, 24289 bytes)
exec evince Out.ps &

12277
(You can also get to the messages window by pressing control-m on your keyboard when the main runabc window is in focus. Hold the control key down and press the 'm' key.)
The Play Selection button behaves similarly. A temporary file with the selected tune is produced. That file is converted to a MIDI file by calling abc2midi. A MIDI player is called to play this MIDI file.
One of the key features of runabc is the ability, to modify how the tune is played. Few abc files have tempo markings or indications or MIDI declarations which indicate how the melody and accompaniment are to be played. As a result the MIDI files do not play at the right tempo and they are all played on an acoustic piano, the default MIDI instrument. Runabc contains configuration menu buttons which allow you to change these defaults. So without modifying the original files, you can hear the tunes the way they should sound like. Similarly, there are configuration menus allowing you to change how the sheet music is printed.
Other top menu buttons provide access to many other useful utilities. The MIDI button is designed specifically for decoding MIDI files using the program midi2abc. The MIDI file can be converted to an abc file, it can be viewed in text mode, or it can be viewed graphically.
The search menu, is designed for handling a large collection of music. You can search for all the tunes having a specific word in the title. You can search for tunes containing a specific musical pattern You can group tunes which have common patterns in the melody line.
The utilities menu contains a random set of functions, including the ability to transpose the music using abc2abc, to expand the guitar chords into a separate voice in the abc file, renumber the tunes and etc. described below.
Getting Started for the First Time
If you install runabc from runabc_setup.exe on Windows, most of the work should be done including the installation of the abcmidi and abcm2ps executables. The program will be installed in the 'Program Files (x86)' folder. Runabc will create a folder runabc_home in your home directory for storing the runabc.ini file and other temporary files that are needed. Runabc and its uninstall program should be on your 'start' button.
If you wish to run runabc from source code, runabc.tcl, on Windows then you will need to install the tcl/tk 8.5 (or 8.6) package. Put runabc.tcl and runabc.ico, in any folder. I usually put it in a folder called something like abc and add the various other executables that are needed like abc2midi.exe, abc2ps, etc into the same folder.
Starting runabc.tcl on Windows is as easy as on that file. Assuming Tcl/Tk is installed on your system, the Tcl/Tk interpreter will start and automatically execute the script runabc.tcl. On other systems such as Unix, Linux and etc. it may be necessary to start runabc.tcl using a command line such as "wish runabc.tcl".
For Unix, you have the same flexibility however the folder must have execution/read/write access for all users. Runabc will also create a runabc_home folder in your home folder where it will place and modify the runabc.ini file. For Linux, there is a runabcexe executable which has tcl/tk built-in. You can put runabcexe in one of the system folders (eg. /usr/bin or /usr/local/bin) and the program will be available to all users. Each user will have their own copy of runabc.ini in their own runabc_home folder.
The first time runabc.tcl starts it checks whether it can find
the abcMIDI package and other helper executables. The results
are reported in a window which may look like this.
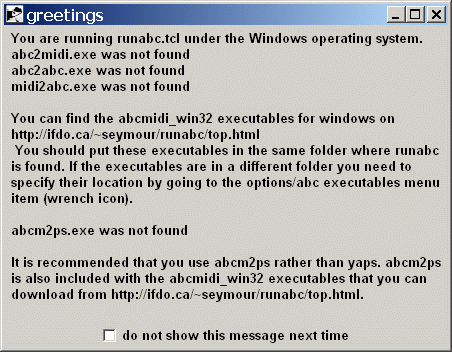
You should fix any of the reported problems so the program can operate properly. To repeat this check, exit and restart the program or alternatively click on the Options/Sanity check menu item (under the wrench icon).
The main screen to runabc.tcl consists of a series of buttons and a list of tunes contained in the specific abc file that you have loaded.
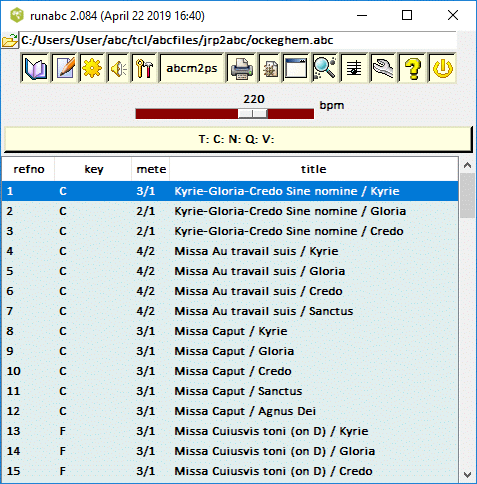
The tunes are ordered as they appear in the file; however, by clicking a column header you can order the tunes by X: reference number, key signature, meter, or title. Clicking on the same button will toggle the order from ascending to descending.
A light yellow box just above the table of contents list some of the header fields for the selected tune. The symbol gs: indicates the tune may contain guitar chords. The symbol %%MIDI indicates that MIDI directives are present in the selected tune. Clicking on this box will display the fields in more detail in a new window called header. A sample window is shown here.
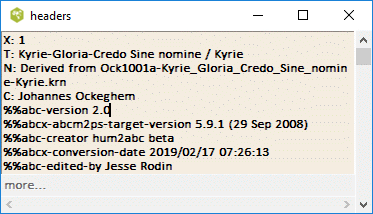
The items highlighted in blue are web links. If you click on one of the items, it will open an internet browser for that site. Recent abc tunes, may contain a F: field which contain a link appropriate to this tune. For example it may direct you to a YouTube video.
Options Menu
If you are running the program for the first time, you should first click the Options menubutton. This is the button showing a wrench. The following menu will be displayed. shown below.
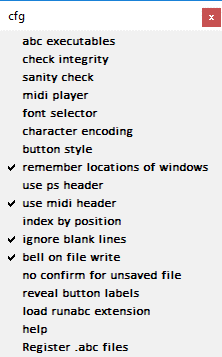
All of these menu items shall be explained here; however, there is also a context help for most of the menu items if you click the 'help' menu item. If you are running runabc for the first time you should look at 'abc executables', 'player', 'font', 'check integrity', and 'sanity check'. The other menu items will make more sense after you have had more experience using runabc.
Assuming the character font is readable on your computer, you should start with the menu item Options/abc executables. Otherwise, adjust the font using Options/font.
abc executables
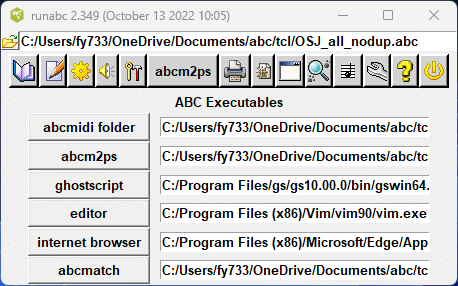
All your abcmidi applications (abc2midi.exe, abc2abc.exe, yaps.exe,
midi2abc.exe and midicopy.exe) should be placed in the same folder. Either
enter the path name of this folder in the abcmidi folder entry box
or start the browser by clicking the button labeled abcmidi folder.
Note that directory paths use the forward slash "/"
even when you are running on a Windows operating system. Tcl/Tk
treats backslashes differently. Once you have found the abcmidi
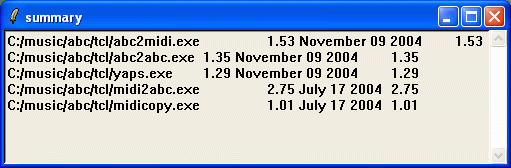
folder, runabc will list the version numbers
and expected version numbers in a summary window shown below.
Missing and required files will be indicated. The
runabc/cfg window will be expanded to include all the abcmidi
paths, in case you need to make minor changes.
Abcm2ps is now the standard for converting abc files to common music notation. Other applications such as abc2ps, jcabc2ps and yaps are left for historical reasons but they are no longer supported. In rare occasions where abcm2ps fails or does not do what you expect, you may resort to the other converters. If you wish to use a particular abc to postscript converter such as jcabc2ps or jaabc2ps, you may substitute its path for abc2ps. applications work better on some abc files. The yaps converter is part of the abcmidi package and may handle certain abc files which would cause abc2ps or abcm2ps to crash. The abcm2ps menu button, on the main menu bar, allows you to select the default abc to PostScript converter. menu.
In order to display postscript files on your screen, you require both ghostscript and a PostScript viewer. Specify the path to these applications. Ghostscript is still supported and new versions come out regularly. It is a fairly big package so it does not come automatically with the runabc installation package. On Windows, Sumatrapdf can display PostScript files and is the preferred viewer. On Linux, there is gv and evince. Sites where you download ghostscript and the viewers are indicated in install.html . Whenever you click on the Display button (indicated with a printer icon), the PostScript viewer is called.
It is now possible to display the music without PostScript viewers if you are satisified in using only abcm2ps (which is sufficient). Abcm2ps can be configured to produce an XML *.svg (Scalable Vector Graphics) file or an *.xhtml file which can both be viewed using an internet browser like Firefox, Chrome and Microsoft Edge on Windows only. Thus you can manage fairly well without installing one of the PostScript viewers, provided that you configure runabc to produce an svg or xhtml file as described below. If you decide to go this way, you may skip the following note in italics but note it is important to specify a path to your web browser in the above configuration window.
If you are using gsview on windows, you may wish to pass the -e argument so that a new gsview window does not appear each time you display another file. Unfortunately, you cannot pass program arguments in the entry box since tcl/tk assumes this is just part of the file or folder name. A simple way around this is to call gsview32.exe indirectly through a batch file. You can also use this batch file to convert the PostScript file to a Acrobat PDF file. For example, here is gsview.bat
REM execute gsview32.exe with the -e option
"C:\Program Files\Ghostgum\gsview\gsview32.exe" -e Out.ps

REM convert Out.ps to out.pdf using gswin32.exe
"C:\Program Files\gs\gs8.53\bin\gswin32.exe" -dBATCH ^
 -dNOPAUSE -sDEVICE=pdfwrite -q -sOutputFile=out.pdf Out.ps
You would now specify the path to gsview.bat in the ghostview entry box. Note you may need to edit gsview.bat if gsview32.exe (gsvwiew64.exe) and gswin32.exe (gswin64.exe) are not in the same locations on your system. (Note the ^ character is a line continuation character for a Windows bat file.)
Though the script has its own editor for creating and editing abc files (with many special features), you may prefer to use your own editor (like vi, emacs, notepad...) for everyday work. You specify the path to the editor in the adjoining entry box.
When you edit a particular tune included in a compilation of tunes in a abc file, runabc extracts this particular tune and saves it to an abc file in runabc_home with a name derived from the title into a specified directory.
Abcmatch is a program for performing searches on abc databases on your hard drive. You will need it when you use the find utility on the menu screen.
Midi player
Now return to the Options menu button and configure the options for the midi player (Options/midi player).
Though support for midi files is gradually diminishing, (Groove Music and VLC do not handle midi files), there is still a lot of free software including music notation software that recognize midi files. On Windows there is vanbasco, Notation Player 3, and on Linux there is Rosegarden and both MuseScore and TiMidity package run on both Windows and Linux. These packages provide other features such as following the score while the music is playing. Furthermore they can be called from a command window. It is convenient to have access to this software, so you can specify up to 4 midi players.
TiMidity requires extra work to configure it and link
to a sound font.
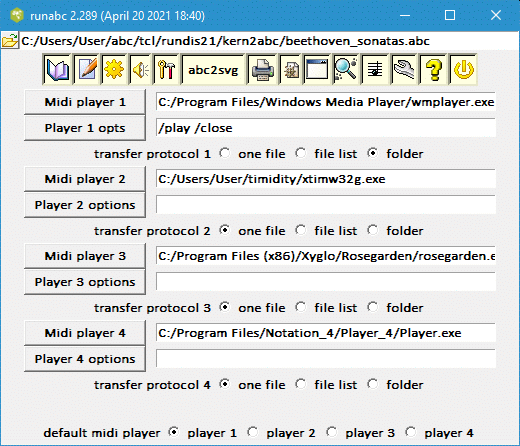
This configuration page is used to specify the path name to the midi players, any required run time options and the protocol for passing the midi files to the midi player. All midi players handle single files. Others can accommodate a list of midi files, while some will even accept a folder of midi files. The manner of passing the midi file(s) to the player is specified by the protocol. You may use any of the three protocols even if you are only passing one midi file to the player, provided the player supports this method. If you are passing a folder then the folder name should be given in the options entry box and the 'folder' radio button should be selected. It is necessary to do this manually since some midi players require the folder name to be preceded by a flag. Note that in some operating systems there may be a limit in the length of the string containing the list of midi files.
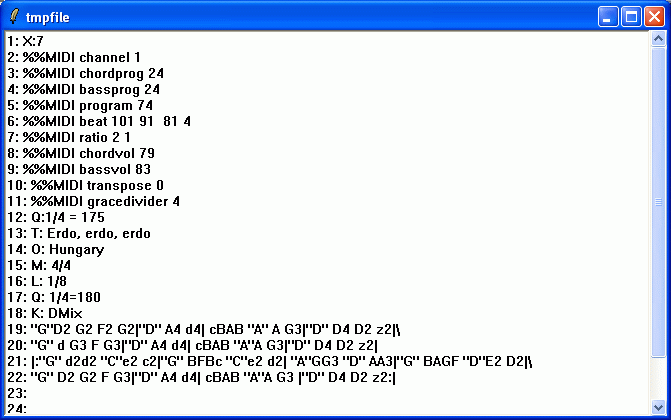
X.tmp
When you click the Play selection button (shows a picture of
a speaker), runabc creates a file called X.tmp containing the selected
abc tunes and puts it in a tmp folder in the same folder from which
runabc.tcl is invoked. (If you wish to use a different subdirectory name
instead of tmp, you should edit the contents of the midi_dir parameter
in the runabc.ini file.) Prior to running abc2midi, any midi files
beginning with the letter X are removed from the tmp directory. Then
abc2midi is executed with the file X.tmp and it creates a new set of
midi files. These midi files are sent to a designated midi player using one
of three protocols. You are allowed to designate up to two possible midi
players which have their own option entry box and protocol.
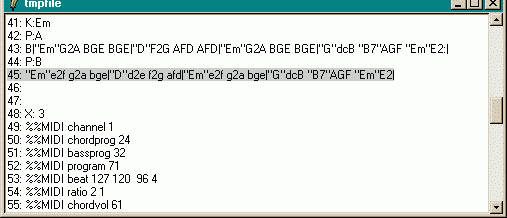
A convenient way for viewing the X.tmp file is to click the Internals/View X.tmp
menu item. Line numbers are added so it is easy to review the error
messages from abc2midi. A sample of such file is shown here.
font
Go to the menu item Options/font and select the font size and weight ideal for your display.
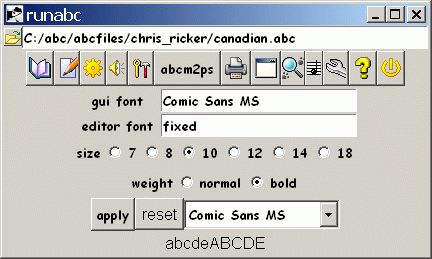
The font size, is very useful for adjusting the size of all windows and buttons to match the resolution settings of your screen. The program uses two different fonts, one for all the buttons and controls and the other to display the table of contents and the editor. Any font is suitable for the former, but you should use an equally spaced font (eg fixed) editor. You enter the names of the fonts in the entry box followed by a carriage return. For tcl/tk 8.5 and higher a combobox at the bottom allows you to browse through the fonts available on your system. Samples characters of the font "abcdefg" are shown at the bottom right. You can get the list of available fonts by typing "font families" while running the Tcl/Tk interpreter (usually called wish). On my system (Windows 98) the list includes Courier, Arial, Century, Comic and many others.
If the font that you choose results in an unreadable screen when you run the script runabc.tcl, you can press the button labeled Reset. Alternatively, you can edit the runabc.ini file and changing the entries for font_family. In the worst case you can delete the entire line and tcl/tk and runabc will try to restore it to something reasonable. If the font you choose does not exist, Tcl/Tk chooses a standard font.
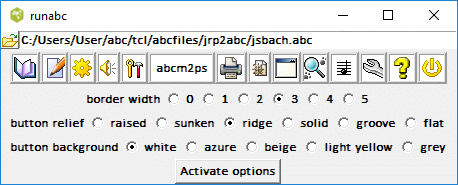
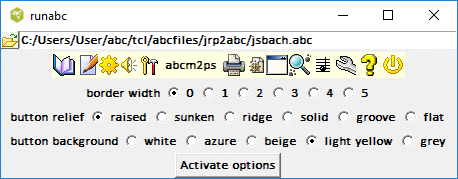
Button Style
The appearance of the sequence of button icons on the top the window can be modified using the various radiobutton. The following images show some of the possibilities.

character encoding
It is unlikely that you will need to change the character encoding unless the abc files have European characters. If the characters in your abc file, look like
T: ~B~_ik-i Ger C: H�seyin Fahreddin Dede O: Turkeyit may be necessary to use a different character encoder. The trick is knowing which encoder to use. As a safe bet, you should try utf-8. Abcm2ps handles utf-8 so if the file uses this scheme, the lyrics and annotation should appear correctly. Click apply to activate this selection. If you click the reset button, the program would revert to the system set on your computer. You may need to reload the table of contents (TOC) by doing an enter in the input file name entry box in order to see the effect.
use abc header
Most tune collections in abc files do not have a header of PostScript commands, so it will not make any difference whether you tick 'use abc header'. A few of these collections may have such a header which may look something like this.
%%pageheight  11.00in
%%pagewidth    8.50in
%%leftmargin   0.35in
%%rightmargin  0.35in
%%topmargin    0.35in
%%botmargin    0.25in
%%staffwidth   7.80in
etc.
before the first tune in the file. If you tick this checkbutton, then runabc will transfer the PostScript header information to abcm2ps when it tries to display the selected tune. In some cases the this header may contain important information so there is no harm including this data; however, in some cases this header may cause some unwanted information when you want to view a particular tune in the collection. In such situations you may want to uncheck this option.
ignore blank lines
The abc standard uses a blank line to separate abc tunes in a compilation of tunes in a file. Unfortunately, different computer platforms use different end of line conventions, (eg. carriage/return linefeed, carriage/return, or linefeed) which get in the way of this convention. On unix, there are programs called dos2unix, unix2dos, mac2unix, etc. which convert a text file to the appropriate convention. If runabc has difficulty detecting the blank line or sees blank lines every where, it is suggested that you tell runabc to ignore this convention by ticking the check box ignore blank lines. Since each tune is supposed to start with an X: reference number, runabc will use this as an indication to separate tunes. Runabc requires that every tune has an X: reference number, T: title, and K: key signature.
sanity check
If you do not succeed in getting runabc working properly, you can do a sanity check and send me the runabc.out file by e-mail to me. The runabc.out file is a text file that you can view with any editor.Register abc files
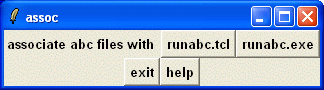
If you are running on Windows, operating system, you will see
the button Register abc files. Clicking this button will
display the following window which will allow you to associate
abc files with runabc. I have not figured out how to use this
feature on Windows 7 and higher.
Associating the abc files with runabc means that whenever you double click on an abc file it will automatically start up runabc with that file loaded. If runabc was already running, then double clicking on the file will load that file into the current process. The association is set up through the Windows registry system.
Normally it is only necessary to create this association once. The association remains permanent (unless changed by another abc application). If you later decide to move runabc to a new directory, then it is necessary to reestablish the association the same way. If at sometime you wish to destroy or change this association, you can do this by going to 'Folder Options' which is accessed from the file manager under the menu item view or toolbar or somthing else (depending on which version of Windows you are running -- 95,98,ME,etc.); then select 'File Types' find ABC, select it and take the appropriate action (eg remove).
When you double click on abc file, windows starts up runabc and loads up the selected abc file. However, the current directory is the same directory where the abc file was found. This poses a problem, since the runabc.ini and tmp directory is normally in the same directory as where runabc was installed. To fix this problem, this function also stores the path name to the runabc install directory in the registry. Runabc determines whether runabc.tcl or runabc.exe are found in the current directory. If they are not found, then runabc looks in the registry to find out where they are located and changes the current directory to this location. Now it is possible to load and store the correct runabc.ini file.
Note if you use runabc.exe or runabc.kit, you should associate the abc files with runabc.exe or runabc.kit.
If you want a similar feature on other operating systems,
it will be necessary for you to set it up yourself. You can put
a link a runabc link in your ~/bin directory (i.e. in your home
directory), so that it points to the location of runabc.tcl.
For example, you would create the link by typing.
ln -s ~/abc/runabc.tcl runabc
Now you can start up runabc from any current directory.
Furthermore, if you enter
runabc sample.abc
where sample.abc is some abc file in your current directory, then
runabc will start up with this file preloaded. However, in order
for this to work properly, you also need to create a new environment
variable called RUNABCPATH which points to the folder where
runabc.tcl is stored. On my system, I added the following to my .bashrc file.
export RUNABCPATH=~/abc/
If this is not done, runabc will create a folder called .runabc in your home folder (if such a folder does not exist) and cd to this folder. The runabc.ini file will be accessed from this folder and a tmp folder will also be created here.
For the Windows 11, see the video setting RUNABCPATH.
Load runabc extension
It is unlikely that you will want to use this function. Occasionally, there is a need to modify the behaviour of runabc for a particular application. For example, you may want to record some of the results in a form so that some othe package like scikit-learn could use them. This feature is very specialized so it not something for general distribution. Clicking on this menu item will start a file browser where you can choose the tcl file that you wish to "source in". You must restart runabc.tcl to get back to the standard version. I have included a couple of such extensions in runabc/extensions/ folder which come with runabc.zip. There is some internal documentation in those files.
Main Features
At this point you are ready to start using the program. Click the file button at the top left, and use the file browser to select the desired abc file. Alternatively, you may enter the full file pathname in the entry box and press 'return'. (The return key can be used to remove the focus, i.e. flashing cursor from many of the entry boxes you will see.) A list of all the tunes in that file should appear below. (If no index appears on the screen, it may be necessary to convert abc text file to unix, dos format or whatever is appropriate for your machine using utilities like dos2unix, see readme file for more discussion.) If you do not have those utilities, you may be able to accomplish this using the edit/copy to file command on the runabc console and create a new copy of the tunes in the abc file. This is discussed later.
Select a tune, using the mouse pointer. If you right click a particular tune, a short summary will pop up in a separate window. Then click the play button, to hear it on your speakers or the display button to view the tune in musical notation. You can select several tunes by dragging the mouse pointer, or clicking with the shift key (or control key) depressed. When you click the play or display button, all the selected tunes will be converted to midi files or a postscript file.
Other bindings: the arrow, page up/down, allow you to scroll up and down the table of contents. In addition the p key or space will play the current selection and the d key will display this selection.
When you right click any tune in the table of contents list box, a short menu (play, display, summary) will pop up. Clicking on play is equivalent to clicking on the speaker icon in the top menu array. A MIDI file of that tune will be created and played. Clicking on the display menu item, is equivalent to clicking on the printer icon in the top menu array. A postscript file will be created for the particular tune and this file will be displayed on the screen. Clicking on the summary menu item, will display the header items of that tune in a separate window called summary. If you want the entire tune shown then set 'summary_enabled' to 2 in runabc.ini.
If you click the Play selection button (which has a speaker
icon), the program will convert the specific tunes to a midi files,
store them in a specific directory (by default tmp in your current
directory) and then attempt to play these midi files using the midi
player that you had designated in the configuration
property sheet. Any error or warning messages reported by abc2midi can
be viewed by clicking the button labeled Console. (The Console
button appears as a rectangular box with a blue bar at the top.)
Note abc2midi is more stringent than abc2ps in the use of
the P: field. The P: field has sometimes been used to put additional
annotation rather than designate the parts and how they are repeated.
The error and warning messages produced by abc2midi and yaps may appear in blue print. If you click on one of those messages, runabc will display the input file (X.tmp) in a separate window and the line associated with this error message will be highlighted with a grey background. Do not attempt to edit the contents of this window since you cannot save the results.
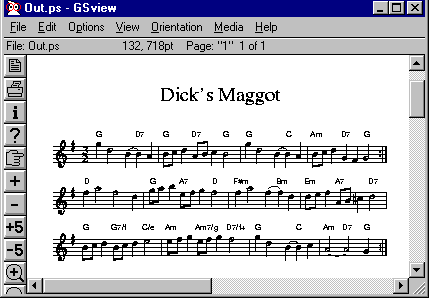
If you click the button labeled Display, the program will create
a postscript file (Out.ps) of the abc file by calling the program abc2ps
or whatever with the appropriate parameters and then display this file by
running ghostview. A sample view of the postscript file is shown below.
Again you can view any messages reported by abc2ps by clicking on the
button labeled console. Abc2ps depends on the X: reference number to find
the selected tune so be sure there are no duplicate numbers or the wrong
tune could be selected. Note abc2ps and its variant may not handle all
forms of line/end conventions even though runabc, yaps and abc2midi can
handle them.
Play Option Menu
Runabc has many advanced features to control how the midi file or postscript file is created. You get to these features by clicking the menu button abc2midi or abc2ps (may also be labeled yaps or abcm2ps).
Few abc notated tunes contain details on how to play the music. Tempo information is often lacking and the music is always played on the MIDI Acoustic Piano. Runabc allows you to change these defaults without altering the input file. Runabc can enliven the tune using additional MIDI directives which are inserted into a copy of the tune. These options are controlled using the menu items described here.
When you are creating and playing the midi file, the Play options menu button provides options for changing the tempo, transposition, assignment of voices to melody and accompaniment, turning off chordal/bass accompaniment, turning off the melody line. (This button shows a picture of a hammer and a pin, standing vertically.) Most of this information is rarely included in the midi file, so it is necessary to automatically insert it before sending it to abc2midi.
Prior to calling abc2midi, runabc creates a copy of the tunes you wish to play with this added information in the file called X.tmp which is stored in the tmp subdirectory. Abc2midi then processes the file X.tmp producing the desired midi files. You can view, but not edit the X.tmp file using the menu button edit/view X.tmp. (The edit button shows an icon of a pencil writing on a sheet of paper.) This is often useful, since the error messages reported by abc2midi (viewed when the console button is clicked), refer to lines in the X.tmp file. Line numbers are automatically inserted by the runabc viewer for your convenience.
Use Midi Header
A midi header contains a collection of %%MIDI commands which occur before the first tune. Most tune collections do not contain such headers so again it will not make any difference whether you check or uncheck this option. However, for some collections you may need to check this option in order that the abc tune is converted correctly to the MIDI file.Tempo/pitch
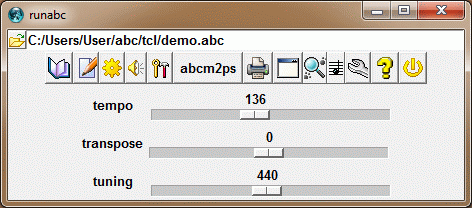
If you wish to change the tempo or choice of instruments in the
midi file, you should click the button labeled Play options
and select tempo/pitch. A new property sheet will appear as shown
below. On line help appropriate to this sheet is available if you now
click the help button.
Most abc files do not have any tempo or midi program indications, so it does not matter whether this program ignores or uses these indications. This also provides complete freedom to change the tempo or instrumentation. However, there are a few abc files (in particular the multivoice files generated by midi2abc) which preserve these indications. If you wish to ignore these indications, check the appropriate boxes in this property page.
The tempo slider allows you to control the tempo in quarter notes per minute. The transpose slider allows you to transpose all channels up or down by a number of semitones. If you move the transpose slider, remember to restore it back to zero. Its position is stored in the runabc.ini file until you change it.
By default, the midi file is tuned to A =440 Hz. If you wish to change it adjust the tuning slider. You have a margin of plus or minus one semitone.
Play Options menu/ arrangement
By default all MIDI tracks are mapped to the acoustic piano. If you wish abc2midi to map the melody track to another instrument, you should select Play options/arrangement and the following sheet will be exposed.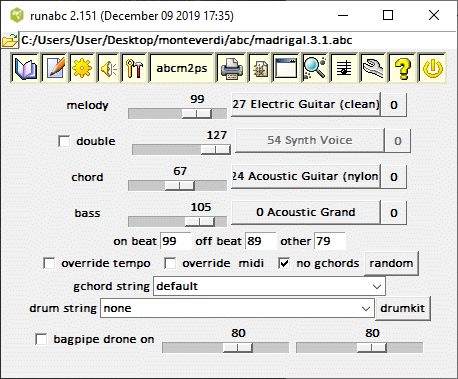 The first four rows in the window, labeled melody, double,
chord and bass provide additional controls on how the
music is played.
Many abc tunes contain guitar chord indications (for example "Dm" or
"G7") specified in the music body. If abc2midi recognizes these
guitar chords, it will automatically create a chord/bass accompaniment
which adds more flavour to the music. Both the chord and bass components
can be adjusted using the controls in this window. There are three
controls for each of these components (a forth one for double).
They control the loudness, the musical instrument, and octave shift.
The first four rows in the window, labeled melody, double,
chord and bass provide additional controls on how the
music is played.
Many abc tunes contain guitar chord indications (for example "Dm" or
"G7") specified in the music body. If abc2midi recognizes these
guitar chords, it will automatically create a chord/bass accompaniment
which adds more flavour to the music. Both the chord and bass components
can be adjusted using the controls in this window. There are three
controls for each of these components (a forth one for double).
They control the loudness, the musical instrument, and octave shift.
The double line with check box is a new feature in runabc. If the box is checked runabc will create another copy of the melody and place it in a separate voice. The way in which this voice is played can be controlled in a the manner discussed below.
If you click on the button labeled Fiddle in the figure, a cascaded menu will allow you to choose a different instrument from a set of 128 General Midi instruments.
A volume slider on the next line adjusts the volume level of the melody. This in effects three numbers labeled on beat, off beat, and other which is used by abc2midi to control the volume level (called note velocity in MIDI terminology) of each note depending on its position in the bar. The velocity for the first beat should be higher than than the offbeat and similarly the velocity of the offbeat should be higher than the other notes. You can edit these in the adjoining entry boxes, or you can adjust them automatically with the volume slider. The volume levels in each entry box should not exceed 127. Though the optional voice labeled double also uses three numbers to control the playback, this is not shown.
The octave menu button, (here the button labeled 0), permits you to play the part one or more octaves above or below what is written in the score. This is particularly useful when you double the melody line with another instrument. For example, you may choose to double the piano with the flute. The flute will stand out better if it is played an octave higher.
Similarly you can select any instruments for the chordal and bass accompaniment, adjust the volume level and the octave shift.
Most notated abc files do not have MIDI directives; however, if the tune does contain MIDI directives, then none of the settings you make will prevail unless you tick override midi check box.
If you tick the no gchords checkbox, bass/chordal accompaniment will be suppressed and all guitar chord indications will be ignored.
If you click the random, the melody,chord and bass will be assigned to random instruments. Sometimes the assignment is terrible but many times the arrangement is quite interesting.
To turn off any one of the components, set the volume level to zero. This may be useful if you wish to practice on your musical instrument by playing along with the accompaniment. There is also an option for drum accompaniment which are described next.
gchord configuration
When guitar chords are present, by default abc2midi generates a track with bass/chordal accompaniment using a set pattern determined by the key signature. The particular pattern can be changed using a %%MIDI gchord command embedded in the abc file. You have the option of choosing your own gchord pattern without modifying the original file using the gchord string combobox. You can either enter the pattern directly in the entry box or select one of the choices in the combobox when you click on the down arrow head. The choices are appropriate for the time signature of the selected tune. As long as you do not restart runabc, the program will remember this choice for all tunes having the same numerator in the time signature.
The gchord pattern is specified using the codes, f (bass fundamental), c (chord) and z (rest). A number after the codes f,c and z specifies the duration. For example the default gchord string or 3/4 time is fzczcz. The duration of the gchord string is always normalized to one measure so that f4c2 and f2c denote the same thing.
Besides the f,c,z codes, new codes g,h,i,j,G,H,I and J were recently introduced for handling broken codes or arpeggios. These codes address the individual notes in the chord starting from the lowest note in the code. The lowest note is not necessarily the root if the chord is an inversion. For example for the C major chord, the ghord string ghih would play the sequence CEGE for every bar. The code GHIJ would play the same notes but at a lower octave.
drums
Though abc2midi can produce drum accompaniment using an embedded %%MIDI drum command, this is very rarely used. For common time signatures, it is easy to add drum accompaniment (without modifying the original tune) using the combobox besides the drum string label. Replace the entry none with one of the patterns in the combobox. Like the gchord, the program will remember this choice for all tunes sharing this time signature.
The %%MIDI drum command is somewhat more complicated since you need to specify both the drum pattern and the percussion instruments. In addition, if you wish to control the loudness of the drum hits, you will need to specifiy the intensities for each drum hit. Clicking the drumkit will display a tool which may make it easier to design a %%MIDI drum command. Further information about the drumkit editor is presented in the section on the TclAbcEditor.
Play options menu/ drumkit
For many folk dances, drum accompaniment may be more appropriate. The MIDI standard assigns one of the channels (usually 10) to be used for drum accompaniment. This means that any MIDI notes indicated in this channel is interpreted as a drum hit. There is a choice of more than 45 percussion instruments which is indicated using the byte normally reserved for the pitch. Since many percussion instruments such as cymbols, triangle, tambourine, ... do not have a pitch associated with the sound this does not pose any problem.
The abcguide.txt indicates how to set up the drum pattern
using several of the %%MIDI extensions of abc2midi. The editor
assists you with a special tool box for incorporating the
drum accompaniment tools/drum. This tools allows you
to create a drum pattern and patch it your abc tune. A simple
pattern is indicated here.
%%MIDI drum dzdd 36 40 40
It consists of a pattern dzdd followed by three numbers
which assign a percussion to each of the three d's. These three
numbers may also be followed by another set of 3 numbers which
specify the loudness of each d. The z signifies a rest.
The d's may be followed by a number that specify the duration
of the hit. For example it is likely that the pattern d2dd would
also sound the same as the above.
Please note that the d's do not correspond to eigth notes or
any particular length. The duration of the d's is adjusted so that
the entire pattern fits into one measure. If the measure is 4/4
then each d of dddd is one quarter note. If the pattern is
dddd3d6 then the first 3 d's form a triplet, the d3 is a quarter
note and the d6 is a half note. If you write ddddd, then each d
is 4/5 of a quarter note or a note of length of duration 4/20.
The same convention also applies to the gchord string.
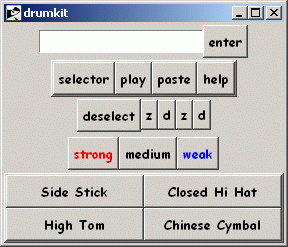
The drumkit entry box at the top is shared with several other windows such as Play Options/Arrangement, so its effect is far reaching. The entry box, is used to input a new drum string. After typing your drum string in the entry box, click on the enter button or press the return button on your keyboard. The drum string should now appear in the third row preceded by the deselect button. If you have not entered the percussion instrument numbers, you can do it by clicking one of the buttons in the pallette below. If you click the enter button again, the program will add default loudness levels (velocities) for each d.
The play button allows you to hear the percussion string. The paste button will paste the drumstring in your file being edited in the abcedit window if it is exposed. The %%MIDI drum command will be pasted at the position of the insert cursor. (Don't forget to insert the %%MIDI drumon command in the body of the music.)
At this point you may wish to edit the drum command. To do this you need to select which d's (besides the deselect button) that you want to change. Hovering the mouse pointer on top of one of the drum hits (will) cause a tooltip to appear indicating the current instrument assigned to this hit. If the hit is strong or weak, the d will appear in either red or blue. To change the attributes of one or more hits, select them by clicking on them so they are now appear selected. Clicking on a selected hit will deselect it. Clicking on the deselect button will deselect all the selected hits. Now clicking on one of the instruments (eg. Side Stick, Closed Hi Hat, etc.) will change the percussion instrument for all the selected hits. Similarly clicking on one of the buttons strong, medium, or weak will change the intensity of the hit.
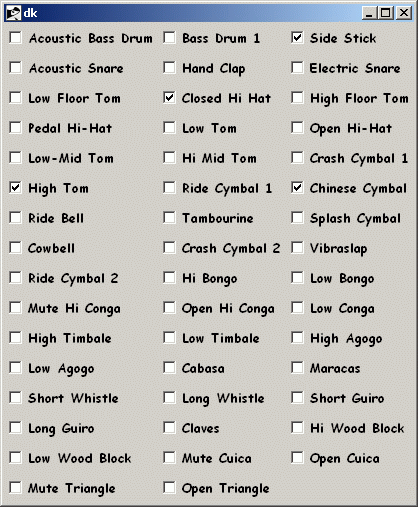
The pallette of percussion instruments is only a random selection
of the 46 or so percussion instruments that are defined by the
General Midi Standard.
The selector button will allow you to change the pallete
of available percussion instruments using the following window.
You can see some sample applications of the %%MIDI drum command in the set of dances in the collection of Balkan and Israeli dances that I have transcribed. I have also included the abc files drumdemo.abc and drumpat.abc in the runabc.zip distribution. The drumpat.abc file is helpful for learning to associate the sounds of the MIDI percussion instruments with their names.
drone
Bagpipe music now has some limited support. If the music is written in the K:Hp or K:hp signature, then you can instruct abc2midi to insert a continuous drone which is played in the background. The loudness of the two instruments generating the drone are configurable using the sliders.Advanced settings
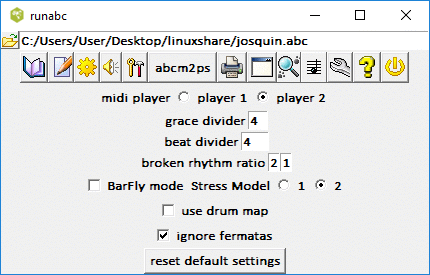
If you have specified an alternate midi player in the configuration property page, you can select the desired midi player to use here. Note: for these changes to take effect, the play mode must be aborted and the play button must be clicked again.
The gracedivider is a new feature which replaces the old %%MIDI grace a/b (still available in abc2midi but no longer supported by runabc). In the old method, you would specify would part of the note could be used for expressing a grace and this ratio would remain fixed. Unfortunately, the length of each grace note is now dependent on the complexity of the grace group and the note to which it was applied. In the new method, the grace note always has a fixed duration, eg (1/64 th note) irrespective of where it occurs. The time is still taken from the following note but the ratio of grace notes to the following note is now variable. If the following note is too short to handle the grace, then the grace is ignored. You specify the duration of the grace notes using the new %%MIDI gracedivider b command. Runabc supports this new command by allowing you to specify the b value. This value specifies the divider applied to the standard note length as specified by the L: field command. For example, for L:1/8 and b=4, all the grace notes would be 1/32nd notes. (Note that in order for this feature to work correctly the version of abc2midi must be 1.44 or higher.)
Broken rhythm ratio adjusts the times for > and < indications in the music body (eg. B > c). The default is 2 to 1, meaning the notes are played as B4/3 c2/3 even though it is printed as B3/2 c1/2. If you want it to be played as written then you should set the ratio to 3.
The parameter beat divider is used for determining which notes are to be considered as strong (off beat). If the time signature is x/y then each note is assigned a position 0,1,2,...x-1 depending on its position in the bar. If its position k, is an exact multiple of n, then that note is considered strong and is assigned a level of b. If you need finer control, you should insert the %%MIDI beatstring string into your abc file. This is documented in the abcguide.txt which comes with the abcmidi distribution.
In multivoiced files, fermatas can cause a problem if the fermata is present in one voice but missing in another. Ticking the box ignore fermatas, tells abc2midi to not extend the fermata notes.
The default button restores all these parameters to factory settings.
Play options menu/ voices
If your abc file uses different voices (V:1, V:2, ...) then you should
select Play options/voices to control the assignment of
the voices to the different MIDI instruments, volume levels and
panning parameter. If the tune has already assigned instruments
to the voices and you have not requested to override all MIDI
indications (in the abc2midi options/tempo-pitch page), then these
changes will not be effective.
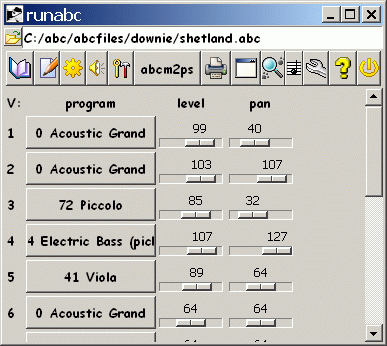 .
.
The panning parameter is useful if you have two speakers. You can shift the voice towards the left or right speaker. If you wish to turn a voice off, simply set the volume level to zero. Be sure to return the level back to normal when you are done, since all settings are saved when you exit from runabc. These options were found to be useful when you are trying to track errors in one of the voices or you are playing a long with the computer using your musical instrument.
Play options menu/random voice arrangment
This option assigns random midi programs to the 16 possible voices shown in the above voices property page. Though this seems strange, it is useful when listening to early polyphonic music. Normally, this music sung by a choir. By assigning the voices to random instruments, the exposure of the distinct contrapuntal melodies is improved. Each random assignment usually brings out other voices which are hidden if they are played on the same instrument.Display Options
You have a choice of several different methods for rendering an abc tune to common music notation; however, only abcm2ps and abc2svg are still maintained and even abcm2ps is coming to the end of the road. Yaps which is part of the abcmidi package has not been updated except for minor cleanup and bug fixes. It is still around because in a few instances it is the only application that can render some abc files.
If you use abcm2ps or yaps to produce PostScript files, then you will need to install a program to view the PostScript files such as ghostview. The live editor in runabc.tcl also requires ghostview. Abcm2ps allows you to embed the common music notation in a html, xhtml, or svg file instead of PostScript. Almost all browsers can handle those files. Abc2svg can run from JavaScript code downloaded from a remote web site, so you do not need abcm2ps. Furthermore, abc2svg includes a player which will follow the score, so you do not require abc2midi or a midi player with sound fonts. For best audio quality, abc2midi, a midi player, and suitable sound fonts is recommended.
The display options menu button, can have one of several icons, abcm2ps, abc2svg, yaps,or other, depending upon which method you use to render the music. For each of these methods there is a distinct menu options. The ps converter cascading menu allows you to choose one of these methods.
Abcm2ps Options
Abcm2ps is an executable and the methods for rendering the music
can be provided as either runtime options or a separate format
file. If you choose a format file, its name and its path must
also be specified as a runtime option. There are many options,
so they are separated into two groups, boolean command options
and numeric command options.
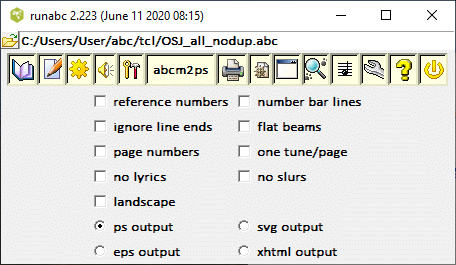
The boolean command options allow you to indicate whether to
create a PostScript, eps, xhtml or svg file. You need to specify
a browser to handle xhtml or svg files. If you choose eps output,
the temporary files will be written in your runabc_home folder,
and not all PostScript file viewers may succeed in displaying any
of the files. The svg file displays only a single tune so if you wish
to create a single file with multiple tunes, you should use the
xhtml or ps representation. Once the music is displayed you can
change the size of the font by holding the control button down
and pressing either + or - on your keyboard. This should not affect
the way the music is printed.
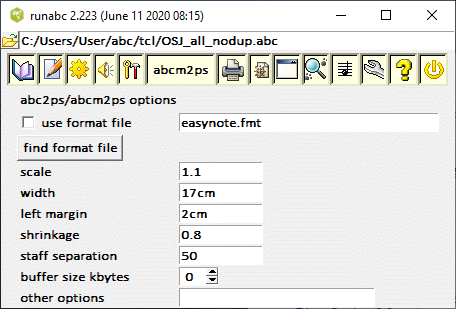
The numeric command options mainly control the page layout. The buffer size in kilobytes is important for handling a large abc file. If the buffer size is insufficient, abcm2ps will fail with the warning Possible buffer overflow. If you set the buffer size to zero abcm2ps will use the default buffer size which is adequate for most abc files.
The run time command options cover a small fraction of all the available controls. There are many other options which are accessible only through a format file. See abcm2ps/abc2svg documentation or ABC Quick Reference Card. If you tick the box use format file, then the selected format file will be loaded into abcm2ps.
The menu item create format file is based on the above document and assists you in creating a format file.
Abc2svg
Abc2svg is a JavaScript library developed by Jef Moine (the creator of abcm2ps) which provides an alternative approach to displaying and playing abc tunes. You get to this option from the top menu button to the left of the Display button (lineprinter icon) and choosing abc2svg from the ps converter sub menu.
Abc2svg operates without using any of the abcmidi, abcmp2s executables; furthermore it does need need ghostscript and its derivatives and it has its own midi players. Instead it uses an internet browser which is standard in any operating system and links to Javascript code. The JavaScript code can be accessed from a remote site or reside on your local disk drive.
Runabc creates a html file containing the desired abc content and sends it to your internet browser. The browser executes the JavaScript code which converts the abc code into the SVG (Scaleable Vector Graphics) representation of the music which is then displayed by your browser.
Once your tune is displayed in the browser, you can start playing the tune by clicking on any of the notes. The browser should play the music while following along the notes.
The player is not as sophisticated as abc2midi but is able to recognize a few of the %%MIDI commands. If guitar chord indications are present in the abc file, they will be played as continuous chords rather than an alberti accompaniment. If you wish to have it follow a %%gchord string, then you will need to create a separate file with the accompaniment in separate voices using Utilities menu/ Gchords/drums to voice.
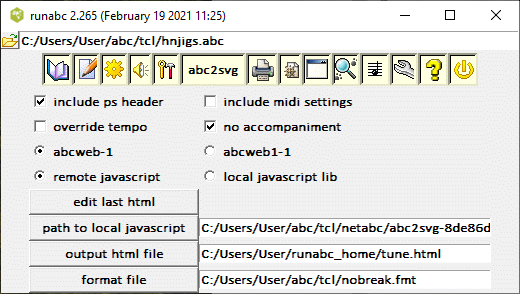
The above image show the current options that are available. If the checkbox include ps header is ticked, then you need to pass a format file that you can generate using the function create format data. If the checkbox include midi settings is ticked then some of the MIDI options that you have set with runabc, for example program mappings to the voices, will be passed to abc2svg. It is recommended that you link to the JavaScript code on Jef Moine's site, so you should select the radio button remote javascript. If you select local javascript lib then you will have to specify the path to this library on your system. By default, runabc creates an html file named tune.html which contains the embedded abc tune and is sent to your internet browser when you press the Display button. You can change this file name and its path in the output html file entry box. You can view or edit the contents of this file (after it was created) by pressing the edit last html button, and this file will be sent to your designated text editor.
Jcabc2ps, Jaabc2ps, Abctab2ps and other abc2ps clones
For the many other postscript file creators, you can select the other radio button in the config/abc executables menu page. When you click on the other ps button, the following configuration page would be displayed.
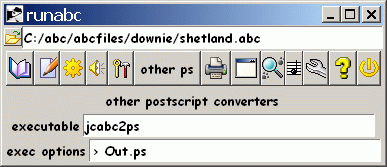
You specify the path name to the executable and the program options in the two entry boxes provided. You may specify as many options as you wish, but you should ensure that the program produces an output file called Out.ps. The input abc file name will be automatically provided by runabc. Unless you are running an old version of runabc (prior to 3.95 April 9 2003) you should no longer specify the selector parameter -e $xsel. Runabc now copies all the selected tunes to a separate file (usually X.tmp) in the tmp folder and the postscript creator processes this file. This avoids several problems (eg. duplicate X: reference numbers). When you click the display button, runabc calls this converter with these options producing an Out.ps file which is then sent to a postscript viewer such as Ghostview. If there are any problems, you should click the Console button in order to see any of the error messages.
Abcm2ps advanced format options
Abcm2ps is the most advanced program for generating common music notation either as a PostScript or SVG file. The program is continuously improved. The program provides many options to control how the music is printed. Another interface was introduced to make these features more accessible. This interface can can be reached from the abcm2ps menu button. An explanation on how to use the interface is given when you start this program. The interface was developed from the format.txt documentation file which is included with the abcm2ps package.
Utilities/Abc2abc interface
The user's interface to abc2abc is hidden away in the Edit menu menu button. Selecting this item causes runabc to display the following frame in its main window.
Abc2abc is one of the programs which comes with the abcmidi package and provides many useful formating and conversion functions. As its name implies, both the input and output are abc files. (If you do not redirect the output to a file, the output will be printed on your command window.) Abc2abc is commonly used to transpose an abc file to a different key signature; however, it provides many other formatting functions. The documentation in the readme.txt file is quite concise and for the benefit of some runabc users, I shall provide a more detailed description below.
The abc2abc interface reflects nearly all the run time options which are listed when you run the program with no options. Thus if you tick the checkbox halve note lengths, abc2abc would be run with the parameter -v. The execution string is displayed at the bottom of the main window after you click the button labeled abc2abc near the bottom. If you had selected, the radio button output to editor, then the abc2abc would be written in a file edit.abc and displayed in TclAbcEditor which will be described in the following section. If you selected the radio button output to clipboard the results would be placed in a clipboard where it can be accessed by most textbased editors. (For example, cntl-v will access the clipboard on the Windows operating system.)
To illustrate the effect of various abc2abc options, consider the following simple example adapted from http://www.leeds.ac.uk/music/Info/RRTuneBk/tunebook.html
X:17
T:Quick Step 71st. Regt.
M:6/8
L:1/8
K:D
dfdecA|dfagfe|dfdecA|dedd3:|
AFABGB|cBcded|AFABGB|cBcd3:|
If the no error report checkbox is not ticked, abc2abc will produce the following output
X: 17
T:Quick Step 71st. Regt.
Z:rrobinson/Aird1.abc
M:6/8
L:1/8
K:D
dfdecA|dfagfe|dfdecA|dedd3
%Warning : No repeat expected, found :|
:|
AFABGB|cBcded|AFABGB|cBcd3
%Warning : No repeat expected, found :|
:|
Unless you are trying to clean up any errors or minor inconsistencies, you would normally have that checkbox ticked so all warnings and error messages are suppressed.
Ticking the box new spacing will result in the following output which would produce a cleaner output when converted to a postscript file.
X: 17
T:Quick Step 71st. Regt.
Z:rrobinson/Aird1.abc
M:6/8
L:1/8
K:D
dfd ecA|dfa gfe|dfd ecA|ded d3:|
AFA BGB|cBc ded|AFA BGB|cBc d3:|
Spaces were placed between beats.
The option use [] for chords and slurs is an ancient remnant when abc files indicated chords with +ACE+ instead of [ACE]. Presently, it is fairly difficult to find abc files using the old convention. Abc2abc would convert the old convention to the new standard if this option is selected.
Running abc2abc with the option double note length produces the following output.
X: 17
T:Quick Step 71st. Regt.
Z:rrobinson/Aird1.abc
M:6/8
L:1/16
K:D
d2f2d2 e2c2A2|d2f2a2 g2f2e2|d2f2d2 e2c2A2|d2e2d2 d6:|
A2F2A2 B2G2B2|c2B2c2 d2e2d2|A2F2A2 B2G2B2|c2B2c2 d6:|
The standard unit length specified by the L: field has been halved to 1/16 and all the notes have been doubled in length. Effectively, there has been no change; however, this feature is sometimes handy when you are transcribing a new tune. The option halve note length does the opposite as illustrated below.
X: 17
T:Quick Step 71st. Regt.
Z:rrobinson/Aird1.abc
M:6/8
L:1/4
K:D
d/2f/2d/2 e/2c/2A/2|d/2f/2a/2 g/2f/2e/2|d/2f/2d/2 e/2c/2A/2|d/2e/2d/2 d3/2:|
A/2F/2A/2 B/2G/2B/2|c/2B/2c/2 d/2e/2d/2|A/2F/2A/2 B/2G/2B/2|c/2B/2c/2 d3/2:|
The option force key to none will produce the following output
X: 17
T:Quick Step 71st. Regt.
Z:rrobinson/Aird1.abc
M:6/8
L:1/8
K:none
d^fd e^cA|d^fa gfe|d^fd e^cA|ded d3:|
A^FA BGB|^cBc ded|A^FA BGB|^cBc d3:|
The key signature is K:none and additional sharps were added to preserve the original music. You can force the key signature to any one of 11 possibilities if you click on the menu item currently labeled none. This feature becomes useful for some jazz music which has so many accidentals that it is hard to assign any particular key signature.
Some musical instruments automatically transpose the music a certain interval. For example, when clarinet plays a piece written in C major, the music comes out in Bb. Ticking the transpose button and entering a number -1 in the semitones entry box produces the following output.
X: 17
T:Quick Step 71st. Regt.
Z:rrobinson/Aird1.abc
M:6/8
L:1/8
K:Db
dfd ecA|dfa gfe|dfd ecA|ded d3:|
AFA BGB|cBc ded|AFA BGB|cBc d3:|
All the notes were shifted down one semitone and the key signature was changed to Db to be consistent. Note it is important to tick the adjoining checkbox for performing the transposition or else no action will be taken.
The placement of linebreaks affects the clarity of the abc file and the appearance postscript converted file. Ticking the linebreaks every n bars allows you to place linebreaks at regular intervals. For example if n is set to 3 the output would look like
X: 17
T:Quick Step 71st. Regt.
Z:rrobinson/Aird1.abc
M:6/8
L:1/8
K:D
dfd ecA|dfa gfe|dfd ecA|
ded d3:|AFA BGB|cBc ded|
AFA BGB|cBc d3:|
The extract only voice is applicable to multivoiced abc files. It will produce an abc file with only the selected voice.
Abc2abc can perform several operations at a time if more than one option has been selected. It has not been tested with all combinations of options, so it is recommended that the user keep things simple. The program performs only one pass through the abc file and the source code has become quite complex in some places. Other useful formatting features such as diatonic transposition has been introduced into the runabc builtin editor which is described in the next section.
Utilities/Gchords/drums to voice
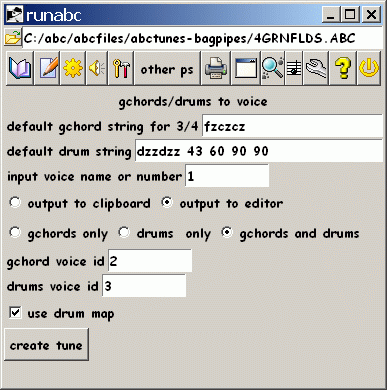
This functions converts the guitar chord indications and drum MIDI commands into separate voices. The benefit of expressing them into separate voices is that the lines can now be edited so that they sound less mechanical. The gchord string determines how the guitar chord is expanded. Similarly the MIDI drum command specifies the drum pattern and drum instruments to use. If the gchord strings or MIDI drum command are already embedded in the tune, they have priority. Otherwise, the program uses the default strings in the two entry boxes. These strings can be edited directly assuming you know what you are doing; alternatively you can go to the Play options/arrangement toolbox. If no gchord string is given, abc2midi automatically selects the one appropriate for the time signature in the tune. The gchord voice is put into voice 2 and the drum voice is put into voice 3. If these are not the desired defaults, you may wish to manually insert these voices into the file by first putting them in a clipboard by pressing create tune. Otherwise the program will create a file edit.abc with the original lines and the added voices and open this file with the builtin editor TclAbcEditor when the create tune button is pressed.
In most cases the guitar chords are found in a none labeled voice (for a single voiced tune) or in the first voice called 1. If this is not the case, then the voice name or number to use should be put in the entry box.
Beware: if no %%MIDI drum indications or %%MIDI gchord indications are present in the file (tune), the program tries to act in a similar way as when it is just playing the file. The indications in the play options/arrangement toolbox rule. In particular, there will be no drum output unless the checkbox drum output is on.
Gchords only
This function creates a new abc tune containing only the guitar chords and rests. All notes are removed. For example,
X: 4
T:The Geese in the Bog
N: page 1
N: hexatonic
R: Jig
M:6/8
L:1/8
K:C
B|"C"cEE GEE|"Am"cEE "G"GAB|"C"cEE "G"GED|"Am"EAA A2 B|\
"C"cEE GEE|cEE "G"GAB|"Am"cBA "G"GED|"Am"EAA A2::
B|"C"cde ged|"Am"eaa "G"ged|"C"cde "G"ged|"Am"eaa a2B|\
"C"cde ged|"Am"eaa "G" ged|"Am"cBA "G"GED|EAA A2:|
Becomes
X: 4
T:The Geese in the Bog
N: page 1
N: hexatonic
R: Jig
M:6/8
L:1/8
K:C
N: gchords only - notes removed
z1| "C"z6| "Am"z3 "G"z3| "C"z3 "G"z3| "Am"z6|
 "C"z6|z3 "G"z3| "Am"z3 "G"z3| "Am"z5::
z1| "C"z6| "Am"z3 "G"z3| "C"z3 "G"z3| "Am"z6|
 "C"z6| "Am"z3 "G"z3| "Am"z3 "G"z3|z5:|
and is displayed in the TclAbcEditor. The function may not handle all abc notation features, so minor editing may be needed.
Utilities/Reformat
The function changes the structure of an abc tune and is put in a Tcl abc edit window. Presently, some inline commands, lyrics and multipart tunes are not handled correctly. The function, chops up the tune into pieces corresponding to bars and then reassembles it according to the selected options. The reassembled tune is displayed in an edit window.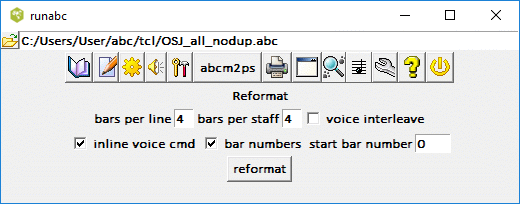
For multivoiced files, you have the choice of having the voice command appear as a inline command rather than in a separate line.
[V:1] z8 |z8 |c8 |d4e4 | % 3
[V:2] c8 |d4e4 |e4e2f2- |f2edc2c'2- |
[V:3] z8 |z8 |z8 |z8 |
[V:4] z8 |z8 |z8 |z8 |
[V:1] e4e2e2- |edc4BA |B4z4 |f8 | % 7
In the above example, the voice numbers appear inline. In addition, you have the option of recording the bar number at the end of the line. The "% 3" indicates that the last measure in the first line, d4e4, is the third bar. Bar numbering begins from zero unless you change it in the entry box.
Utilities/Multivoice extraction functions
The purpose of this function is to allow you to go from a full score (i.e. music for all instruments encoded in separate voices) to the sheet music of one part (one instrument). Musicians do not like turning pages while performing and would prefer if all the music fits on one or two pages on their music stand; so they would prefer to have the music for just their part. If there is a long series of rests where they are not playing, it is preferable that they are grouped together into one long rest. Sometimes their instrument automatically transposes the music to another key, so they would like the sheet music to be transposed accordingly. In contrast when the music is being notated, it is preferable to have all the parts together and interleaved.
The multivoice extraction function attempts to address this problem. First there is the problem of extracting and possibly transposing one of the voices. This is not trivial if the voices are interleaved. Next there is the problem of combining a sequence of bar rests. They would be indicated for each bar so that the music interleaves properly.
For historic reasons there are two conventions for indicating multirests. The old notation required by abc2ps uses something like "15"z8 where the number 15 indicates 15 consecutive bars and z8 is the length of a rest covering one bar. The newer notation would indicate this as Z15, where the upper case Z implies a full bar rest. Abc2midi, abcm2ps, yaps and other applications only understand the new notation.
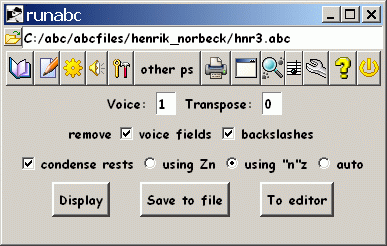
Now here is a description of how this is done. First you indicate which voice number and any transposition in the first two entry boxes. Tranposition is indicated by an integer specifying the number of semitones to shift the music. Positive numbers shift the pitch upwards. Negative numbers shift downwards. Zero implies no transposition. If you tick the checkbox condense rests, then a line of music written as:
z4|z4|z4|z4|z4|AB CD|BC AA|would appear either like:
"5"z4|AB CD|BC AA|or
Z5| AB CD| BC AA|depending on which radio button you have selected. If you select auto, then runabc will make its selection depending on which postscript converter you have chosen (abc2ps or other). The buttons marked "Display", "Save to file" or "To editor", performs the appropriate action. If you select "Display", the part will be extracted, converted to a Postscript file and displayed using gsview or whatever. If you select "Save to file", you will be asked for a abc file name for saving the part. If you select "To editor", the part will appear in the TclAbcEditor.
The extraction, transposition and rest condensation are all done
by the external application abc2abc. In fact, when you perform
the action the exec command appears appears at the bottom of
the window for your information.
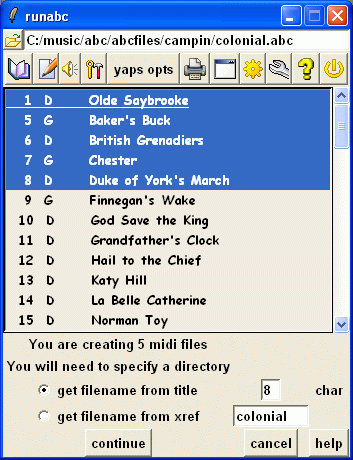
The midi files will be named automatically in one of two ways depending on the radio buttons selection. The midi file name can be derived from the tune's title or else it can be derived from its xref number in the file. If you derive it from the title, the maximum number of characters in the tail part of the file name is by default 8 letters. So the midi file derived from the tune "April Waltz" would be called April_Wa.mid. You can change this default by replacing the value in the adjacent entry box. Note that if there are several tunes with the same title, that the same midi file may be overwritten several times.
Alternatively, you can choose to derive the midi file name from its xref number. The names of the midi files will be based on the name of the open abc file (in the TOC) and the X reference numbers. Thus if your active file is waltz.abc and you selected tunes 5 and 8, the file names will be waltz5.mid and waltz8.mid. You can choose a different root name by replacing the string in the adjacent entry box.
When you click the continue button, the program will proceed to create the midi files. All the files will be put into a separate folder that you will select. If the folder does not exist, you will can enter its name in the entry box and the folder will be automatically created.
Utilities/Drum Toolbox
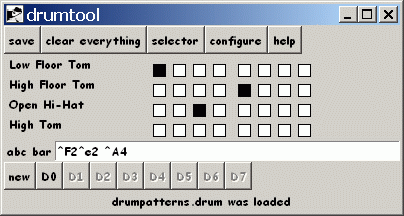
This toolbox provides a means of generating a separate voice for the percussion instruments using a symbolic notation.
Below is a sample drum voice.
X:1
T: percussion sample
M: 3/4
L: 1/8
K: C
V: 1
%%MIDI channel 10
[E,,G,,]2 z1G,,1 G,,2 | [E,,G,,]2 z1G,,1 G,,2 |\
[E,,^C,]2 ^C,,2 ^C,,2 |[^C,C,]1^C,1^C,1^C,1 ^F,2^F,2 C2C2 |
MIDI channel 10 is reserved for percussion instruments. The percussion instruments are indicated by a MIDI pitch which is represented by a particular abc note. For example the pitch E,, represents the Electric Snare.
The drum voice is generally consists of a few patterns which are repeated many times. Each pattern is one bar long. The drum tool represents each drum pattern by a symbol D0, D1,D2, and etc. Up to 8 drum patterns can be defined. These drum patterns may be imported into the MultiVoicedEditor.
Prior to using the drum tool it is necessary to indicate the time signature, unit length and number of subbeats using the configuration menu described below.
Assuming you have completed the configuration, you can close this window and select the percussion instruments by clicking on the selector button. If you are remapping the drum notes (use drummap is ticked in the advance menu page), the selection of drum instruments must remain constant for the abc tune.
Once this is done you are ready to create drum patterns which are associated with the symbols D0, D1, D2,and etc.
The drum pattern is edited graphically by flipping the color of one of the rectangles occuring in the above array. Clicking on the name of any percussion instrument on the left column allows you to preview the sound of the instrument. The grid of rectangles which fills the main part of the window is used to create a percussion rhythm. Clicking on one of the rectangles selects a particular instrument and the time it is hit relative to the beginning of the bar. Each column of the grid relates to a specific time in the bar. The abc representation of the pattern is shown in the abc bar entry box which is updated each time the color of a rectangle is flipped, or when one of the existing patterns D0, D1, etc is recalled. The abc representation of each pattern that you define is stored with the other configuration parameters in the *.drum file whenever you click on the save button.
Initially, the pattern is automatically stored in D0 as the other buttons are disabled. To store another pattern, click the button labeled new and D1 will be enabled and selected. As a convenience, the last drum pattern you edited will be transferred to the new button so you can make minor variations. Any modifications to the drum pattern will now be stored in D1. Clicking D0 will restore the pattern stored in p0 and select it for further editing. You can audition the pattern by right clicking on the chosen pattern button.
The clear everything button clears all patterns D0, D1, and etc.
Drum Toolbox Configuration

Prior to defining the drum patterns it is necessary to configure the measure into subbeats and to select the percussion instruments. This information can be stored in a configuration file (eg. drumpatterns.drum) which will be loaded automatically each time the drum tool window is invoked. The name of this configuration file can be changed so that you can maintain more than one file. Click on the configure button. The name of the drum configuration file is stored in the file entry box. If you click the enter button and if the configuration file already exists, then it will be loaded into the toolbox.
You must enter the meter of the music and the unit length (L:) that you wish to use. The beat entry box specifies the number of beats or subbeats (sometimes called tatums) that you wish to use. The subbeat is the smallest unit of time that a drum measure is divided. If there are 8 subbeats in a measure than an array of 8 columns of rectangles will be displayed in the drumtool window. As a convenience you may place spaces between the array of subbeats separating the main beats in the bar. For example if you enter 4 4 (do not enter commas), then the 8 subbeats will be divided into groups of 4. The total number of subbeats must be a multiple of a power of two of the numerator of the time signature. Thus if the time signature if n/m, then the sum of all the subbeats should be n, 2*n, 4*n, 8*n etc. For example, for 7/8 time, beat could be 2 2 3, or 4 4 6 and etc. The program does not handle triplets, so multiples of 3 will not work well. The program will automatically choose a time factor so that a drum pattern will fill a bar and be consistent with specified unit length. Using a unit length (L:1/n) where n is a power of 2 and close to the total number of subbeats may avoid fractions in the abc representation.
The beatstring provides fine control on the velocities (loudness) of each of the subbeats. It corresponds to the MIDI beatstring that abc2midi recognizes. Only f,m, or p standing for forte, mezzo, or piano are recognized. For example the string fpppmppp would assign each of the subbeats f, p, p, and etc. The velocities associated with these are entered in the MIDI beat entry boxes. The values must not exceed 127.
When you click on one of the enter buttons, the program checks the consistencies of the parameters and reports any problems in a message string which may appear at the bottom of the cfg_drumtool window.
The tempo scale (Q: 1/4=n), specifies the tempo that the drum patterns will be played when you audition them using one of the methods to be discussed. It does not need to be the tempo of the actual abc file.
The configuration parameters should be set before creating any drum patterns since, changing them later will invalidate any parameters that you already created. (It may be adviseable to clear everything if this happens.)
Utilities/Pitch Histogram
The type of guitar chords to be added to a tune depends to some
degree on the scale mode. The mode is usually determined from tonal
center and the key signature; however, this method is not always
reliable. This utility determines the histogram of the pitches
used in the tune and attempts to find the best mode which matches
the distribution. The pitch frequencies are weighted by the
note length.

A histogram normalized to a probability values is displayed and the best 5 models are listed. The models are ranked by the correlation value between the distribution and the mode model.
Note as a convenience, the plot is updated any time you select another tune in the TOC (table of contents window).
You can save the histogram plot as a PostScript file by
right clicking the mouse pointer while the pointer is on the
histogram. The program will prompt you for a file name to
store the file. The file name should have a *.ps extension
like hist.ps. Ghostview contains software for converting
a PostScript file to other formats. For example on Linux
you can convert the file to a png file format as follows.
gs -sDEVICE=png16 -SOutputFile=hist.png hist.ps
*.png formatted image files are suitable for inclusion on
web pages.
I am grateful to Hudson Lacerda, who supplied the algorithm, reference models, and sample code.
Utilities/Pitch Interval Histogram
A histogram of the pitch interval between adjacent notes is plotted. In the case of chords, the pitch of the highest note is used.
Chordgram
The chordgram provides a chordal analysis of the selected abc tune. It is computed by first converting the tune into a MIDI file and then analyzing the resulting MIDI file. Here is an example of a chordgram for the folk tune Ali Pasha. The horizontal scale is the beat number. The vertical scale is the root of the chord followed by its roman numeral analysis.
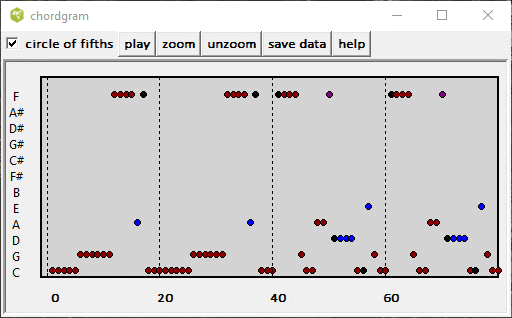
which looks like
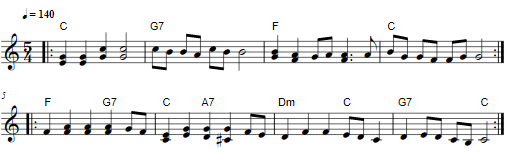
Simpler chordgrams for popular music are shown in a separate section.
Notegram
The notegram shows the distribution of pitch classes of the notes in the abc file.
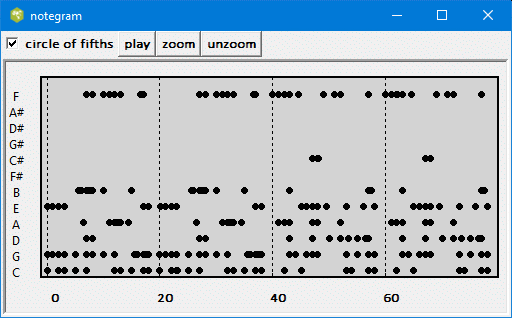
Save midi file(s)
You can save a tune as a midi file using the utilities/save midi file(s)
menu item. Runabc will prompt you for the name (path name) of the midi file.
It is not necessary for you to enter a mid extension, but if you include
it the program will not insert another one. If you wish to make many
midi files at once, just select the tunes in the TOC and use the same
function. Recall that the <cntl>-/ will select all tunes,
<cntl>-\ will deselect all tunes, <cntl>-mouse click will select or
deselect a tune in the TOC. When you select this menu item, a property sheet
shown below will appear below the TOC.
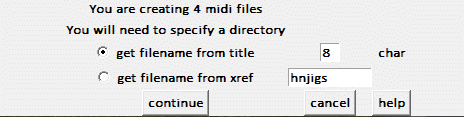
Utilities/Save sheet music in PostScript (ps) format
The displayed sheet music can be saved in PostScript format in a file of your choosing.Utilities/Save sheet music in pdf format
The displayed sheet music can be saved as a pdf file. The conversion requires runabc linking to ghostscript software.Split file
This function applies to an abc file containing a compilation of say 50 tunes. It will extract each of the 50 tunes and write them into 50 separate abc files in a folder that you will specify. You will also need to specify whether the filename of these abc files is based on either the X: reference number or the title in the T: field. If you need to extract only one tune from the collection, then you should edit the selection and use the editor to save it to a file.Utilities menu/ Copy
The function will copy the selected tunes in the table of contents to a designated abc file. If the file does not already exist, it will create a new file; otherwise, it will destroy the existing file and overwrite it with the selected tunes. The X: numbers will be preserved.Copy and renumber will do the same as above but it will renumber the selected tunes increasing sequentially from a selected number.
Copy all will copy the entire open abc file including all text to another file and renumber the X: reference numbers sequentially starting from a selected number. The user specifies the output file (save file) and the starting X: reference number.
Append will append the selected tunes to an existing file, preserving the original numbering.
Append and renumber will do the same but renumber the selected tunes.
The copy combine parts function is specificly designed to reformat Laura Conrads renaissance music in her allparts.abc files. Each part is written as a separate tune rather than a separate voice. Therefore it is not possible to create a midi file with all parts playing simultaneously. This function combines all the parts into one tune, giving each part a separate voice. Duplicate titles, and lyrics are removed. When using this function, you must first select (highlight) all the tunes that you wish to combine. Like other copy functions, you will prompted for the name of an output file.
Caution: do not try to copy over the source file already displayed in the table of contents.
The function 'separate tunes' splits a multitune abc file into separate files each containing one tune and puts the files into a directory with the same name as the input file (without the abc extension). You should select all the tunes that you want to extract in the TOC before using this function. To select all tunes press cntl-/ (i.e. control-slash).
Utilities menu/ Incipits
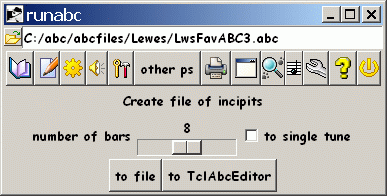
The function will copy the first few bars of all the tunes in the table of contents to a designated file or place it in the TclAbcEditor buffer. If the checkbox 'to single tune' is ticked, all the incipits will be stuffed into a single tune. This produces the most compact Postscript file when abcm2ps is executed on the output file and also allows you to put all the incipits in one MIDI file. If the checkbox is not ticked then each incipit goes into a separate tune and all the X: reference numbers are preserved. The number of bars in the incipit can be configured using the scale widget.
For multivoiced files, the first few bars of each voice will be copied. The function handles inline voice commands eg \[V:2\]\ but they should be placed at the beginning of the line.
If you want to produce incipits for any a selection of tunes, first copy the selected tunes to a separate abc file using runabc edit/copy command and then load that file into the TOC.
Edit file
It opens the selected abc file using the text editor that you selected in the Options/ABC Executables menu page.
Edit Selection
It extracts the selected tune from the abc file, and displays it in the text editor. By default, the file will be saved in the runabc_home folder.
Edit menu/TclAbcEditor
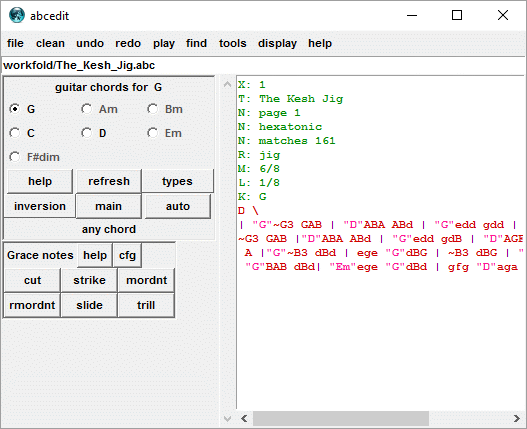
Introduction
As a text editor, this is not the best. I prefer to use a different editor most of the time. However, in order to provide special editing features such as reformatting, transposing, introducing grace notes or guitar chords, and various clean up features, it was necessary to design my own editor. The play button is one of the most useful features that allows you to play any selected section of abc tune. This is useful when you are trying out different chords or trying to identify a bar that does not sound right.The editor requires Tcl/Tk version 8.5 or higher. It will not run properly with older versions of Tcl/Tk. If you are not sure which version it uses, you can run the sanity check by pressing going to the config/sanity check menu item. Alternatively you can press the alt-s key on the keyboard as soon as runabc starts and look at the runabc.out text file. (Be sure that the runabc window is in focus, or else the program will not pick up the alt-s key.)
Syntax highlighting is done in real time while you are editing the text; however, if for some reason the highlighting appears incorrect, you can restore the correct colours by clicking the clean/retag button. The choice of colours for syntax highlighting can be changed by editing the variables edit_body_colour, edit_field_colour etc in the runabc.ini file. You can find out the names of the various colours by running one of the listboxes demos which comes in the Tk Widget Demonstration package in the Tcl/Tk distribution.)
The editor does not copy the global headers which appear at the beginning of a abc file; however, if you do require them you can import them using the file menu command 'insert global header'.
The undo button or the <cntl-z> key will undo any of your changes. You have unlimited undo's provided there is sufficient memory in your computer. The redo button or the <cntl-y> keys on Windows or the <cntl-Z> keys on all other platforms, will redo your changes.
Before running any editors, you should designate your favourite editor in the Options/abc executables menu page. If you have not done this, then this editor will remain your default. However even if you have designated a different editor, you can still start this editor from the menu item Edit menu/TclAbcEditor.
Secondly, you should specify a directory name in the work folder entry box where your work will be stored. Don't worry if the directory does not exist. It will be created automatically if it is not found. The directory is relative to where you are running runabc. Thirdly, you should ensure that a fixed spacing font (the same one used in the TOC) is chosen. This is the default unless, you have reconfigured this in the Options/font.
Assuming that you are editing a particular tune in a file containing many tunes, then runabc will copy this tune to a separate file, with a file name derived from the title of the tune. The file will be placed in your working folder which you should have designated in the Options/abc executables property sheet. Then this file will be opened by either your own editor or by TclAbcEditor depending on whether you choose edit selection or TclAbcEditor. If you choose the menu item, edit file, then the active file containing all the tunes would be opened by the editor. Note that if you decide to do it this way, you should have runabc reread this file (by reopening the same file), after you have done the save so that its table of contents is resynced. Otherwise, runabc may behave strangely and play the wrong tune that you selected. Also note, this method is not as safe as no backup is made unless your particular editor does this automatically.
TclAbcEditor, uses the Tcl/Tk Text Widget standard bindings described here. These bindings are also listed in the runabc context help.
Text Widget standard binding.- Any-key: inserts normal printing characters.
- Button-1: set the insert point, clear the selection, set focus.
- Button-1-Motion: sweep out a selection from insert point.
- Shift-Button-1: adjust the end of the selection closest to the mouse.
- Shift-Left: move cursor and extend selection.
- Button-2: paste the selection, or set the scrolling anchor.
- Button-2-motion: scroll the window.
- Arrow-keys: shift insert point.
- Shift-Arrow-keys: shift insert point and extend or clear selection.
- Cntl-n: shift insert point to next line.
- Cntl-p: shift insert point to previous line.
- Cntl-f: shift insert point one character to the right.
- Cntl-b: shift insert point one character to the left.
- Cntl-d: deletes character to right of the cursor.
- Cntl-k: deletes from cursor to end of the line.
- Cntl-o: inserts a new line but does not advance cursor.
- Cntl-t: transposes two characters.
- Cntl-z: undo last insert or delete.
- Cntl-y: redo last undo (for Windows only).
- Cntl-Z: redo last undo (for all other platforms).
- Cntl-c: copies the selection to the clipboard.
- Cntl-x: cuts the selection and copies to the clipboard.
- Cntl-v: pastes from the clipboard (Windows).
- Cntl-y: pastes from the clipboard (Unix).
- Cntl-slash: selects everything in the text widget.
- Cntl-backslash: clears the selection.
- Shift-arrow-keys: alter the selection.
- Delete: delete selection if any, otherwise delete character to the right.
- Backspace: delete selection if any, otherwise delete character to the left.
- Alt-f: shift insert point one bar line to the left.
- Alt-b: shift insert point one bar line to the right.
- Alt-r: raise the note in front of the cursor.
- Alt-l: lower the note in front of the cursor.
- Alt-e: expand the duration of the note in front of the cursor.
- Alt-c: contract the duration of the note in front of the cursor.
- Alt-t: transfer editor buffer information to abcmatch (discussed later).
- Alt-s: will copy the buffer to a file using 'save as'.
- Alt-S: will copy the buffer to a file using 'save'.
- Alt-d: shortcut to display.
In addition to the keyboard shortcuts, if you right click inside the edit window a small pop-up menu allows you to play or display the music or the selected area.
In order to save the results, you must go to the file/save or file/save as menu item. On Unix systems, you may hear a bell during a file write operation; however, I did not manage to get the bell working on Microsoft Windows Tcl/Tk. If you have modified the file and did not perform a save, the editor will ask you whether you wish to save the file prior to exiting.
If you are editing a particular tune in a file containing a collection of tunes, you can replace that tune in the collection using the menu item file / replace tune in collection . The program will also create a backup file of this collection, however it is recommended that you have an independent backup.
If you are creating a new tune using the menu item Edit menu/new tune, will automatically create a file edit.abc for a lack of a better name. This file will have a template (X:.. T: etc.) for you to fill in. Note that you should do a save as to specify the desired file name, or else you may remain with a file called edit.abc which will be overwritten or deleted many times.
At this point, I shall describe the many special features of this editor. Most of these features all called up from the menu items clean, play and tools; however, other features such as the guitar chord toolbox and grace notes toolbox appear on the right. The program assigns an initial width of 60 columns for the editor. If you need more space, you can move the toolbox out of the way or you can expand the window. If you always want it to start with more than 60 columns, you can change the value associated with the variable edit_initial_width in the file runabc.ini to something a little larger.
Other features are accessible from the cascaded menus at the top of the window. Many of the menus contain an individual help button that provides information relevant to these functions. Many of these features are not applied to the entire file you are editing but to only the selected area. You select an area by sweeping the mouse pointer while holding the left button down. (Other methods are described in the online help.)
Guitar chords
A lot of abc tunes contain a single voice without any harmony. This sounds rather plain when it is converted to a MIDI file. The addition of guitar chords (contained in double quotes) greatly enhances the quality of the reproduction. Abc2midi will generate a chordal/bass accompaniment that helps the listener to quickly establish the key of the music and the beat of the tune. The guitar toolbox on the right contains various functions for automatically or manually inserting guitar chords.
There are general rules for adding guitar chords. If the music is in a major key signature, eg. you should stay with the major chords which are I, IV and V. For C major they would translate to G, C and D. For minor key signatures which includes modes like Dorian and Phrygian, you should also include the minor chords II, III, VI, VII. You are also free to use the IV and V when appropriate. The editor automatically figures out the chords appropriate for the key signature and places the list in the guitar chords labeled frame on the left. The primary chords for that mode are shown in a darker color relative to the secondary chords. (They were chosen to accentuate the characteristic note of the particular mode.)
To insert chords using a built-in algorithm, press the button
marked auto. The algorithm restricts the chords to the
primary chords for the current mode. You can change the set
of primary chords by clicking the button labeled main.
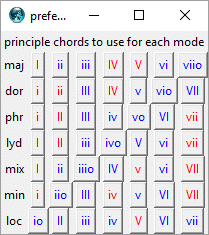
Clicking any chord symbol button, with flip its status.
To see its effect on the chord table in the TclEditor chord
window, you need to also click on the button labeled
refresh.
To manually place a chord, position the edit window cursor at the appropriate spot in the music, and then click one of the chord menu buttons. If the cursor precedes an existing guitar chord, you can replace it with another chord the same way. Usually a guitar chord should be specified for each bar, but if it has not changed in the previous bars, it may be left out.
If the key signature has changed, you may get the recommended chords for the new key signature by clicking the refresh button when the cursor in the edit window is past the key change.
To change the chord type and inversion type for a specific chord, first indicate which chord you wish to modify by selecting it from the list in the guitar chords frame, here Bb Cm Dm etc. When you select it, the chord will still be placed in the position of the insert cursor in your edit window but the corresponding radio button will also be ticked. (If you place the cursor at the end of the tune -- past the last barline --, then no chord symbol will be inserted into the tune.) Now press the types menu button and select the type of chord you want. (There is some duplication in this list.) For example, if F is your active chord and you selected 7, then F would be changed to F7. If this is the chord you want then just click F7 and the guitar chord F7 will replace F at your current cursor position assuming you had not moved the cursor. If you also want the first inversion, then click inversion to change F7 to F7/A. This chord type and inversion type will remain fixed for that chord until you close the edit window or click the refresh button.
Below the inversion button is a list of suggested chords that should follow based on the chordal progression. You do not have to follow this progression, however the music may sound strange if you do not.
Grace Notes
The grace toolbox which occurs below the guitar toolbox, is used for inserting various grace notes prior to a specific note in the file. Position, the cursor just before the note you want to grace (eg. A) and then select one of the grace sequences. For example if you click trill, {ABAB} will be inserted just before the note. If you change your mind and want slide, you can click that button and the grace note sequence will be changed. This only works if you have not moved the edit cursor and it is positioned just before the start of the trill. The sequence labeled cut is more formally known as appoggiatura. The sequence labeled strike is musically known as acciacccatura. Other sequences are mordent and reverse mordent, slide and trill.
The button labeled cfg is used for configuring the grace
note labels and sequences; however, their labels should be seven
or less letters. To make a change, place the cursor in one of the
entry boxes shown below and type in the new name or sequence followed
with a carriage return. These changes will remain the next time
you start runabc. To return to the initial settings, click the
reset button.
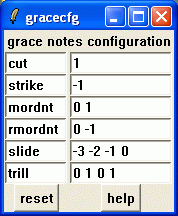
The grace note sequence is indicated by a series of small positive or negative numbers. They indicate the relative pitch offset between the grace note and the note to which it is being applied.
Other formatting and editing tools
The cascaded menu item clean contains numerous functions. The retag item will retag the field commands and body of the file in different colours. Otherwise any new items that you have added will remain in black. erase all does what it says. You end up with a blank buffer.
You can remove all redundant guitar chords. (A guitar chord is redundant to abc2midi if it has not changed in the previous bar.)
You can remove all guitar chords or anything else included in double quotes from the designated portion of the file.
You can remove all grace notes or anything else included in curly braces from the designated part of the file.
Other functions such as remove inline voice fields, remove backslash continuations and remove tab chars are also self explanatory. These functions are handy when you are extracting a single voice from a multivoice file using the edit/extract part menu function.
There are special tools for transposing all the notes in certain section of the edit window.
You can replace each note in selected group of notes with the chords. For example the notes FAA FAd can be converted to [FD][AF][AF] [FD][AF][dB] by selecting tools/chords/third.
The above operation can be reversed using the tool replace chords.
For example if your selected region includes
[A2D2][AD][BE] [c2F2][d2G2] | [cF][BE][cF][A-D-] [A4D4]
you can replace it with either
A2AB c2d2 | cBcA A4
or
D2DE F2G2 | FEFD D4
using this tool. The tool handles chords containing up to 4 notes.
The notes in the chord are sorted by pitch and you select which
note (eg. highest pitch) that should replace the chord.
This tool is useful for formatting the music into separate
voices. For example you can change,
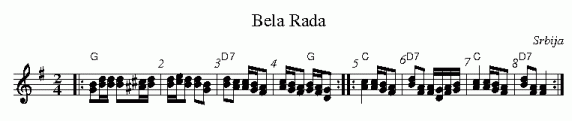
to
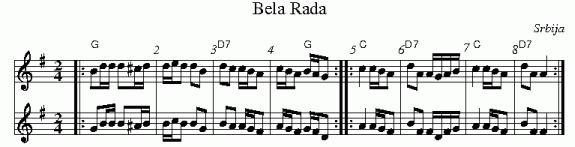
This is illustrated below for the following abc file.
X: 6
T: Bela Rada
R:
O: Srbija
B:
D:
Z: John Chambers <jc@eddie.mit.edu> http://ecf-guest.mit.edu/~jc/music/
M: 2/4
L: 1/16
K: G
|: "G"[B2G2][dB][dB] [d2B2][^c^A][dB] | [dB][ec][d2B2] [d2B2][B2G2] \
| "D7"[d2B2][c2A2] [cA][BG][A2F2] | [cA][BG][A2F2] "G"[BG][AF][G2D2] :|
|: "C"[c4A4] [cA][BG][A2F2] | "D7"[d2B2][A2F2] [AF][GD][AF][BG] \
|  "C"[c4A4] [cA][BG][A2F2] | "D7"[d2B2][A2F2] [A4F4] :|
The body of the music was duplicated by highlighting, grabbing it into the clipboard using the cntl-c, and dumping it using the cntl-v (or cntl-y in unix) command. V: fields were added to separate the copies so that the edit window now looks like
X: 6
T: Bela Rada
R:
O: Srbija
B:
D:
Z: John Chambers <jc@eddie.mit.edu> http://ecf-guest.mit.edu/~jc/music/
M: 2/4
L: 1/16
K: G
V:1
|: "G"[B2G2][dB][dB] [d2B2][^c^A][dB] | [dB][ec][d2B2] [d2B2][B2G2] \
| "D7"[d2B2][c2A2] [cA][BG][A2F2] | [cA][BG][A2F2] "G"[BG][AF][G2D2] :|
|: "C"[c4A4] [cA][BG][A2F2] | "D7"[d2B2][A2F2] [AF][GD][AF][BG] \
|  "C"[c4A4] [cA][BG][A2F2] | "D7"[d2B2][A2F2] [A4F4] :|
V:2
|: "G"[B2G2][dB][dB] [d2B2][^c^A][dB] | [dB][ec][d2B2] [d2B2][B2G2] \
| "D7"[d2B2][c2A2] [cA][BG][A2F2] | [cA][BG][A2F2] "G"[BG][AF][G2D2] :|
|: "C"[c4A4] [cA][BG][A2F2] | "D7"[d2B2][A2F2] [AF][GD][AF][BG] \
|  "C"[c4A4] [cA][BG][A2F2] | "D7"[d2B2][A2F2] [A4F4] :|
V:1 body was selected and the "tools/replace chords/with top note" was used to replace each chord with the top note. Guitar chords were removed from the second voice using "clean/remove all guitar chords". Finally the chords in the second voice were replaced by the second highest note using "tools/x replace chords/with 2nd note". The resulting edit window now appears as follows.
X: 6
T: Bela Rada
R:
O: Srbija
B:
D:
Z: John Chambers <jc@eddie.mit.edu> http://ecf-guest.mit.edu/~jc/music/
M: 2/4
L: 1/16
K: G
V:1
|: "G"B2dd d2^cd | ded2 d2B2 \
| "D7"d2c2 cBA2 | cBA2 "G"BAG2 :|
|: "C"c4 cBA2 | "D7"d2A2 AGAB \
|  "C"c4 cBA2 | "D7"d2A2 A4 :|
V:2
|: G2BB B2^AB | BcB2 B2G2 \
| B2A2 AGF2 | AGF2 GFD2 :|
|: A4 AGF2 | B2F2 FDFG \
|  A4 AGF2 | B2F2 F4 :|
The tool x replace chords differs from replace chords in the manner that it treats notes that are not embedded in chords. Instead of repeating the note, it is replaced with an invisible rest. Thus
G2 [A2c2]would be replaced with
x2 A2The tool solfege vocalization appends the solfege do/re/me.. symbols to the notes as a lyric line. For example if the following lines were highlighted for a tune in the key of Em,
A2 A3 c BA|B2 G3 B AG|A2 D2 ddcA|B8|!
A2 A3 c BA|B2 B2 c2 BA|G2 G2 AAGF|E8:|!
The function would replace these lines with
A2 A3 c BA|B2 G3 B AG|A2 D2 ddcA|B8|!
w: re re fa me re | me do me re do | re so so so fa re | me |
A2 A3 c BA|B2 B2 c2 BA|G2 G2 AAGF|E8:|!
w: re re fa me re | me me fa me re | do do re re do ti | la |
The vocalizations use the moveable-do system (as opposed to fixed-do). For the key of E minor, the relative major is G major so G is represented by do. The purpose of this function is to assist in learning music sight reading. The function figures out the key signature by searching backwards for the first K: field indication. (If the music contains key modulations, it is recommended that you highlight only the part of the music in the same key.) The program attempts to ignore guitar chords, decorations, field commands etc. but it is not perfect. For example something like ... A:| is mistaken for a field command and ignored, so the output may require minor editing. The program also ignores all accidentals since I have not learnt how to treat them.
The function align bars will cause the editor to insert spaces before the bar lines so that they line up vertically. This is done without changing the way the tune would be converted to a postscript or midi file. The image below shows part of a tune before the alignment.
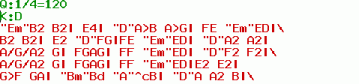 The next image shows the effect of the alignment. Though the
alignment expands the size of the abc file, it is easier to
read or edit. The alignment is applied on the entire contents
of the edit window, so only one tune should be loaded. The
algorithm is not very smart, so funny results may be obtained
for some files. (For example tunes containing double bar lines.)
The next image shows the effect of the alignment. Though the
alignment expands the size of the abc file, it is easier to
read or edit. The alignment is applied on the entire contents
of the edit window, so only one tune should be loaded. The
algorithm is not very smart, so funny results may be obtained
for some files. (For example tunes containing double bar lines.)

The function add guitar chords will insert appropriate guitar chords in the tune based on the key signature and the configuration of notes in each bar. For each key signature which also includes modes like maj, min, dor, and etc., the function picks three suitable guitar chords. For example for E minor, the function would choose Em, Am, and D. For each bar, the function would pick the guitar chord from this set whose notes matches closest to the notes in the bar.
There is a separate display button for converting the entire contents in the editor to a common music notation postscript file and displaying it on the computer.
The edit button now gives you a choice of editing the entire abc file or just the selected tune. If you edit only a selected tune then it will be copied into a file called edit.abc in the same directory as runabc.tcl. This file will then be renamed to another file based on the title of the first tune in your selection. The renamed file will be placed in runabc_home. In event there is another file with the same name, it will be replaced. You may use the save-as button to save the tune under a different file name, but under no condition overwrite the original file containing the collection since only the contents of the edit window are copied. When you do any editing, it is strongly recommended that you keep backups somewhere else just in case the unexpected occurs. Further notes about the edit button may be found in the runabc.txt file included in the runabc.zip distribution.
The play and display commands always rereads the original abc file, so you must save your changes to the disk file to hear the edited results. I always prefer editing a single tune files and update the compilation abc file using cut and paste or something similar when I am finished editing. I prefer to use the editor with which I am most familiar rather than the Tcl/Tk text widget. In any case, other people may have different styles.
Also be aware that if you are editing a compilation or deleting, adding or renumbering a tune, the table of contents window (title index) will need to be updated by rereading the same file. Otherwise, the play, display and edit selected tune may go to the wrong tune.
The edit/new option will create a template edit.abc file.
Live Editor
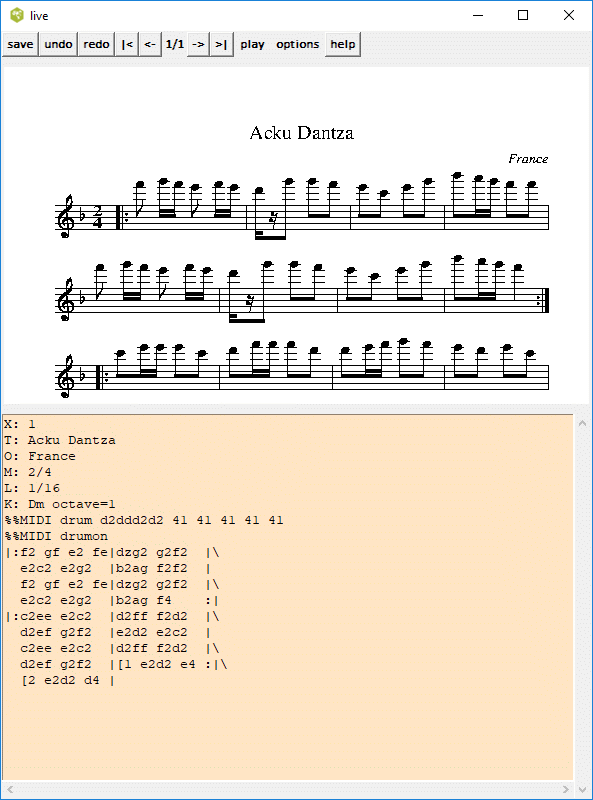
This editor requires ghostscript to operate. A separate window, pops up similar to what is shown above. This window shows the the music score and the abc notation for any tune that is selected in the TOC (table of contents) list box. If you edit the music notation, the music score will be updated immediately.
When you edit the tune, the save button will be shown in red to signal that you need to do a save in order to update the open abc file. Provided that you have not done a save, you can undo or redo any of your changes.
If you click on a note in the music window, a cursor will be placed at the corresponding note in the editor. If you hold the left alt button down while the editor is in focus, the corresponding note in the music window will be highlighted in red. This feature may not work correctly if the PostScript header block appearing before the first X: reference command is imported and modifies the scale factor. (You may need to untick the option 'use abc header' in the options menu.)
In the case that the score does not fit on a page, the top arrow buttons allow you to go to the first, next, previous, or final page. The page number and the number of pages is shown as a fraction in the middle.
The play menu button is designed to play a small portion of the file. You can either play a single text line positioned at your insert cursor or else you can play a selected area. To designate a selected area, hold the left mouse button down and sweep an area with your cursor in the edit window. Avoid selecting an area starting with a line feed. The tcl/tk script will search backwards for the X: and other field commands occurring before your highlighted area and also use this information for creating the midi file.
The options menu allows you to scale the score representation,
or change to a horizontal orientation if you have the space on
your screen.
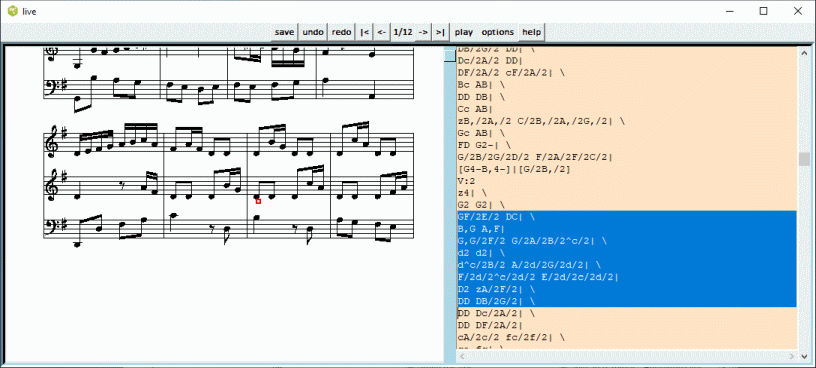
Show hotspots is useful to check the operation of the program.
MultiVoicedEditor
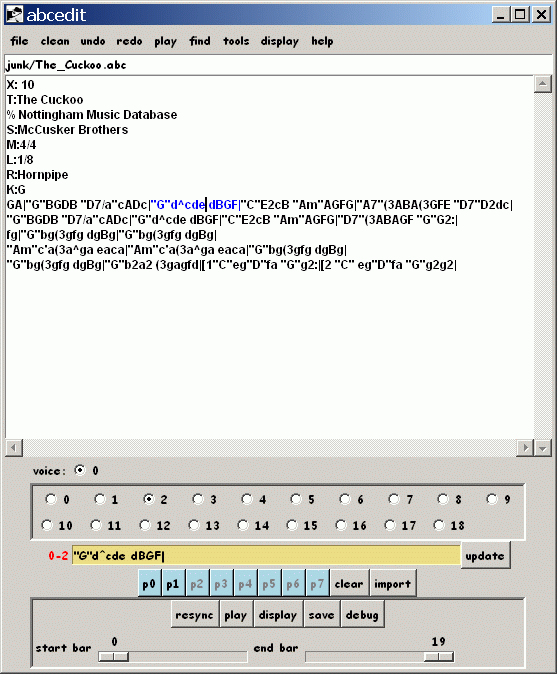
This is a clone of the TclAbcEditor. The editor provides direct access to any specific bar and voice, assuming you know the bar number. Alternatively if you click inside any bar in the text window, the bar is highlighted in blue, the bar and voice number is indicated and the bar contents appears in an entry box. This provides a means of establishing or verifying synchrony when it is not too obvious how the bars match in the different voice. In addition, you can paste any repetitive sequence of notes into any bar (which is useful when you are creating drum accompaniment). The editor also allows you to play, display, or save a subsection of the notated tune.
Like the reformat function in the utilities menu, the tune is chopped up into pieces corresponding to the individual bars. (For debugging you can print the pieces in a separate window by pressing debug button.) The pieces are displayed in the text edit window with individual tags so they appear in blue when the mouse is clicked inside the region of the piece. In order to maintain synchrony between the internal representation and the edit window representation, edits should be done on the individual piece displayed in the entry box and then pressing the update button. This will also save the bar in one of the pattern buttons below in case you wish to paste it into another bar. (To paste one of the saved bar, simply click on one of the p buttons, and the current bar (in blue) will be replaced.)
You can still make direct edits in the text window, however, it is necessary to click on the resync button after making these direct changes in order that the internal representation is updated.
The import button provides a link to the drum patterns created by the drum tool.
For big scores, only the first 60 bar number radio buttons are initially shown. To see the next next of radio buttons click the next button.
There are still a few quirks with this function as well as the reformat function which shares the same interface.
ABCarus
ABCarus is a new user interface created by Avik Topchyan. The program is based on Jef Moine's abc2svg JavaScript library. The program resides on your computer and runs locally. It can run on Windows, Mac OS, or Linux. You can find releases on Avik's github site. Like runabc the program is designed to work with ABC music notation files. You can navigate,edit, and render a large collection of abc files. It is a fairly complete package, so once it is running you can exit runabc and continue your work with ABCarus.
There are two links to the ABCarus interface. The first link loads your active abc file into ABCarus. If your active abc file consists of a collection of tunes, then you may prefer to use the ABCarus editor* instead. ABCarus editor* loads the particular tune you have selected and adds the various %%MIDI commands that you have set. In order to do this, runabc.tcl extracts the selected tune, records it in a temporary file called X.abc in your runabc_home, and then instructs ABCarus to open this file. X.abc is a temporary file, so any changes to this file should be saved under a different file name in a different folder outside of runabc_home.
Though you can run ABCarus directly from its AppImage file, you will get better response if you install it on your system. On Windows 11, run ABCarus-setup-x64.exe. After you have installed the program on your system, you need to tell runabc where to find it using the Options/ABC Executables property page. On Windows 11, ABCarus.exe isi found in the folder AppData/Local/Programs/abc-electron-proto/.
On Linux, ABCarus-x86_64-portable.tar.gz, unzip and tar -xf the resulting file. The contents will be installed in the /usr/bin/ and /usr/lib/ folders and a link ABCarus will be created. Executing this link will start ABCarus. You should tell runabc to go to this link in the Options/ABC executables page.
Note that you do not need runabc.tcl to run ABCarus. On Windows 11, there is a link under the start button. ABCuras remembers the name of the last file you opened and other settings. ABCarus is still being developed, so you should check github site for new releases.
Abc Transcription Tools
This is a web web site created and supported by Michael Eskin. The page contains many features for editing, displaying, and playing abc and other music notation files. In addition, it has many other tools to deal with music libaries. There is no setup needed to use this tool, since the link to this web page is built into runabc. Like ABCarus, Eskin's software is also comprehensive, and you can continue your work without runabc.
Export to Muscore
Muscore is a piece of software that you need to install on your computer. It accepts MusicXML file which is a standard for exchanging digital sheet music. You will also need to acquire abc2xml in order to convert an abc file into the musicxml format. This is actually a Python script which runs in a Python environment (just like runabc runs in a Tcl/Tk environment). For the Windows PC, you can get abc2xml.exe in which the Python environment is already included. For other operating systems like Linux, you will need to install a recent version of Python. Once you have installed these applications, you then need to tell runabc where they are found by editing the Options/ABC Executables page. Here are how the pages look on my system.
Linux Mint
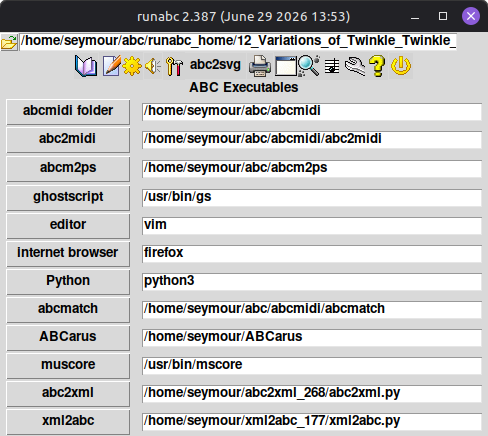
Windows 11
There are several versions of Python going by names like Python2, Python3, Python3.10 and etc. Typically some developers and users may install more than one version on their system. You need to indicate which version to use in the Python entry box. For example on my linux system, my python system is called python3.
Internals
The Console button has now been replaced by a menu button called
internals. The menu appears as below.
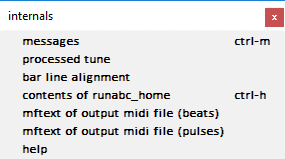
-
messages
Displays the communications between runabc and the external executables. Clicking this command or ctrl-m pops up a window which is automatically updated whenever you take an action such as play and display. Here is an example: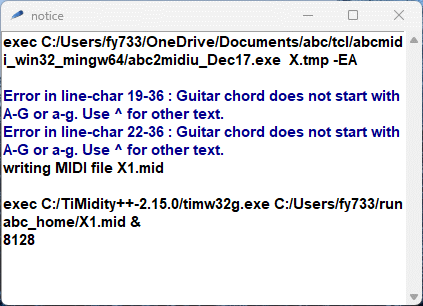
At the request of the user, runabc extracted the selected tune from a compilation inserted additional %%MIDI commands indicating how to play the tune, saved this to a file called X.tmp, created a midi file (X1.mid) from X.tmp by calling abc2midi (or a clone), and finally calling a midi player to play this file. Abc2midiu_Dec17.exe returned some error messages which are displayed in blue on the message box.
When you click on one of the blue error messages,
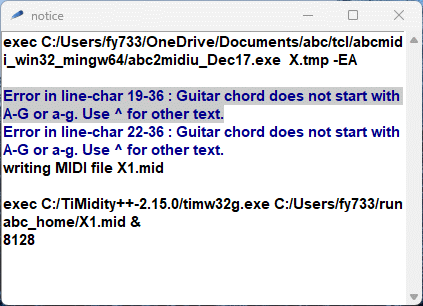
Another window pops up showing the contents of X.tmp, and the line of code where the error occurred.
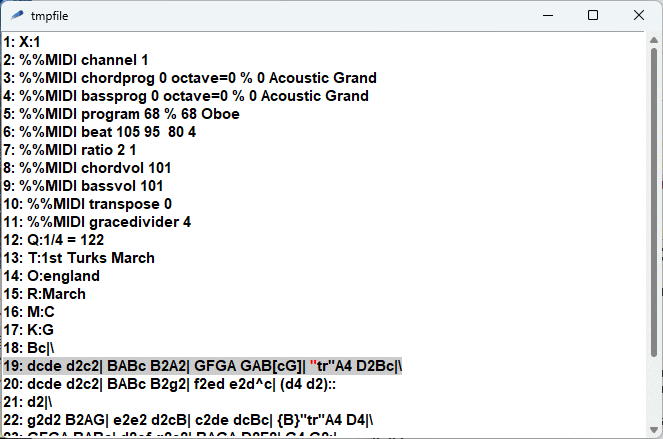
Here the problem is the text "tr". The user intended that it causes the next note to be trilled; however abc2midi interpreted this as a gchord. The user should have just preceded the note with the letter T.
If the message box is exposed, it may be updated automatically when you do another operation. If this does not occur you may need to invoke this operation by the key command ctrl-m or returning to the same menu button.
-
You also have the option of saving the X.tmp file under a different name.
- You have the option of viewing the midi file in textual form\ (using mftext) or converting the midi file back to abc notation \ using midi2abc.
- Midinotes
There are now several programs for converting abc notation files into midi files -- some of which may still be in development. The presence of microtones or non standard temperaments presents a challenge to these programs. Midinotes was designed particularly to check the pitches of the notes and their pitchbends. These are listed in a window and you can save this to a file. (You could compare that file produced by a different abc2midi converter.) If midinotes is called from the Internals menu, then it will analyze the last tune that you played. You can also call midinotes from the Midi Menu, where you can select any midi file on your system. Here is how the window may appear.
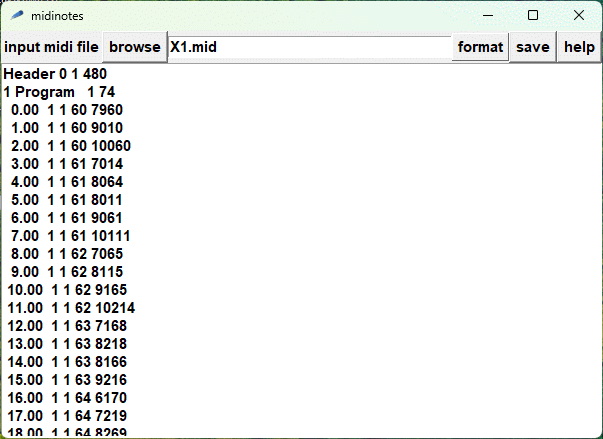
Here is part of the output for an equal tempered scaled with 36 divisions. The first column shows the modified midi pitch (in midi pitch units) after taking into account the pitchbend or the single note tuning in the sysex exclusive message. The next column indicates the pitch shift in cents units (there are 100 cents in a semitone) from the nearest note. Thus -20 cents, indicates that the pitch of the note was shifted downward by one-fifth of a semitone. If the pitch change was effected by a pitchbend value, then the pitchbend is indicated in parentheses in the next column. (A pitchbend of 8192 indicates no pitch shift. One semitone shift is effected by 4096 pitchbend units from 8192.) If the pitch shift was effected by a sysex exclusive command, then the pitchshift is not presented. (Jef Moine's JavaScripts uses the sysex exclusive command rather than pitchbends.) The last column indicates the pitch in cents units where an entire octave covers a span of 1200 cents. Natural C is 0 and B, is 1100. The purpose of this table is to verify that there are no gaps in this equal tempered scale.
You can save this output to a file and use it to compare with a different abc to midi converter.
- Midicsv
Midicsv is an external program by John Walker, which is useful when one is trying to identify problems with the output midi file. The programs produces a text representation of the input midi file, which could be converted back to the midi file if you have midicsv. A csv file stands for comma separated values. All the values in the text file are separated by commas.
You probably will not need this function unless you suspect there is something wrong with the midi file. Here is how it run.

Enter or browse the path to the input midi file, if it is not indicated in the entry box, and then click on Go button. Your should see the following window.
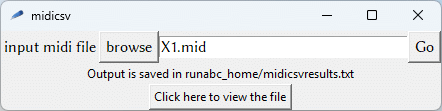
If you choose to view the result, the output should look similar to

- contents of runabc_home lists the temporary files with the time of last modification in the runabc_home directory. Typing ctrl-h will also display or update these contents. Here is a sample:
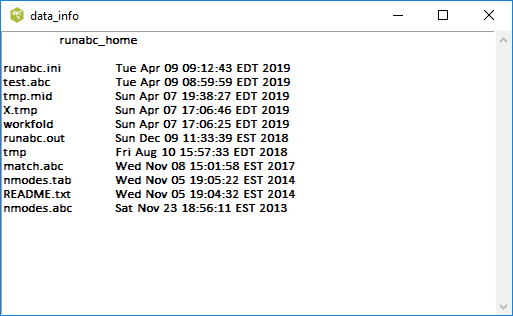
The clean button will remove all files ending with .abc, .tmp, .mid\ .txt, .html, .ps, and .out.
- bar line alignment
Shows the beat count (quarter note) at each bar line for every midi track (voice). When you select this command abc2midi runs with the -c option. No midi file is created but, abc2midi checks for errors and produces a file barloc.txt in the runabc_home folder. The contents of this file is reformatted and displayed in a separate window. This function is still experimental.
Search Menu/Find Title
The Search Menu button shows a picture of a magnifying glass. If you are like me, you probably have a collection of several hundred abcfiles. Finding a specific tune can be quite laborious. If you have placed all your abcfiles into a specific folder, there is now a tool which makes it much easier to find a specific file or tune. When you click the button labeled 'find', a new tool will be displayed on your screen.
If this is the first time you are running this tool, it is necessary to enter the path name of the folder where all the abc files are located. This folder can contain sub-folders with more abc files. Now you are all set up. Just enter a word or two in the title in the search string entry box and then press carriage return or click the button labeled search. The program will search every abc file it finds for the specific word, and display the title of tunes in the listbox. (In this case, we were searching for any tunes with the word maggot.) If you have a big directory and some large files, please allow some time for the program to perform the search. You may abort the search anytime if you are getting too many hits.
To access any tune in the list box, just click that entry and the table of contents of that file will be displayed. Furthermore, the table of contents will be scrolled to the position where the file is visible.
The tool does not distinguish between upper and lower case letters; however, you should avoid punctuation marks and special characters as they mean something special to the string matching algorithm. The string you enter is interpreted as a regular Tcl expression using the regexp. As a result you can make fairly complex searches. For example,
| mary | john | will return any title containing the word mary or john |
| fairies$ | will return any title ending with the word fairies |
| ^some | will return any title starting with the word some |
Search/Find Bar
Find Bar is the first of several tools for analyzing the contents of an abc file. Its objective is for searching a library of abc notated tunes for certain melodic fragments. Most of the processing is done by an external program called abcmatch which is part of the abcMIDI package. Over the past few years other search methods were added to abcmatch and runabc was extended to serve as user interface to these tools.
Most melodic matching applications are restricted to the the beginning sequence of notes in the tune which defines the main melody of the tune that listeners remember. Most tunes contain an A and B section and there are no tools for handling the B section. Furthermore, the goal was to develop a tool that could search for musical fragments in any part of the tune. To limit the computational processing time, the musical fragments had to fit in a musical measure or bar or a sequence of measures.
Many abc notated tunes contain guitar chords, grace notes and decorations. They are ignored since they can vary in the music representation of the tune. Also the same tune could be notated in different keys, so the search algorithm should be able to compensate for the different key signatures. In addition, the search algorithm should be tolerant to minor variations without having significant impact on the search time.
The find bars function was designed to handle a large collection of tunes. They could be in a single file or in multiple files stored in a folder or a folder tree structure. The user specifies the file or the directory to be searched. The template which specifies the musical information to be matched is given in another file called match.abc. Runabc contains the user interface for creating match.abc and specifying the file or directory to be searched.
To use this tool, you enter one or more bars from the tune in the body entry box using abc notation. Also specify the meter, note length and key signature in the entry boxes M: L: and K:. Then press the match button.
A more convenient way to enter this information is to use TclAbcEditor. Edit a tune containing the musical fragments of interest and highlight the bars. The bars have to be contiguous. Then copy this information by clicking the transfer button or press alt-t on your keyboard. The selected bars will be transferred to the template entry box, and the meter, note length, and key signature will be obtained from the active tune. The matcher window will open automatically and the selected bars will be transferred. The play button allows you to listen to the fragment you selected. Clicking the match button will start the search and the output of the search will be displayed in a scrolled text window shown below.
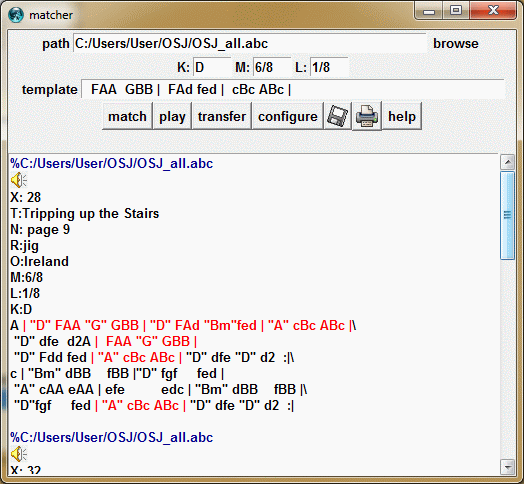
Bars which match the given criterion will be shown in red. If you click the file names shown in blue, that file will be automatically loaded in the table of contents and the specific matched tune will be selected in the list box. To listen to the matched tune click on the speaker icon.
The characteristics of the matching algorithm is configured by means of
the matchcfg window, accessible from the configure button.
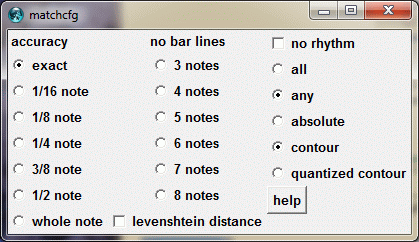
These configuration buttons also apply to the match tune and grouper functions that will be described below.
The buttons control how the matching algorithm is executed on the collection of tunes. For example, if the no rhythm checkbutton is ticked, the duration of the notes are ignored allowing for example bar |ABcd| to match any of the following |(3ABc d2|A>B c>d| A/B/cd2| and any other rhythm variations fitting in a measure. Note tied notes are treated as separate notes.
The options below the left most column, accuracy affect the temporal resolution of the matching algorithm. These options require that the time signature of the template, matches the time signature of the matching tune and is best described with the following example. Suppose the template consists of a bar of sixteenth notes given here.
GAGc AGFE GEGB FEGA|and it is being compared with the following 4 bars.
GBGc AGFE GeGB FEGA| G2Gc AEFD GEGd FEGG|
GABc AGED GEAB FEAB| GABc BGED GDEF DEAG|
If the resolution is set to exact or 1/16 note, only the first bar will match with the template. If the resolution is reduced to 1/8 note, then the template is approximated by a string of 1/8 notes
G2G2 A2F2 G2G2 F2G2|and similarly the 4 bars now look as follows to the matcher,
G2G2 A2F2 G2G2 F2G2| G2G2 A2F2 G2G2 F2G2|
G2B2 A2E2 G2A2 F2A2| G2B2 B2E2 G2E2 D2A2|
so both the first and second bar will match. Essentially, the matching algorithm replaces the notes, in the bars by a stream of 1/8 notes or whatever was selected and compares the two streams. The pitch value of each note in the stream corresponds to the pitch value in the given bar at the specific time position.
If the resolution is reduced to 1/4 notes, then the template, will be approximated by a string of 1/4 notes.
G4 A4 G4 F4|and the first 3 bars will match.
Reducing the resolution to 1/2 notes would cause all four bars to match which may result in a lot of trivial matches being reported unless the all radiobutton (on the right column) is selected instead of the any any button.
If exact is selected, the notes must match exactly (allowing for key transposition).
If any of the options in the middle column are set, it is not necessary for the time signature of the template to match the tune in consideration. The matching algorithm still starts from the beginning of a bar, however only the first n notes are considered. If there are fewer than n notes in the bar, the matcher will continue through the next bar.
There are two sets of choices in the right most column options. The first set consists of the choice all or any. If all is selected, then all the bars in the template must match in the given sequence. If any is selected, then the bars in the template match independently. In fact only one of the bars may match in the tune.
The other choices are absolute, contour, and quantized contour. In absolute mode, the pitches of the notes must match exactly relative to the key signature. Provided the key difference is less than six semitones in either direction.
The differences between the three methods is best described with the following example. Let the following bar be the template
CEGE|and the tune being matched be
CEGE|FAcA|GBdB|EGBG|
The key signature is C major. If method is set to absolute only the first bar CEGE is matched. The next two bars also have the same pattern, but they are not placed in the correct position in the C major scale. However, if the matching method is set to contour, they two will be matched. Contour matching only looks at the relationships between the notes in the bar. Essentially, FAcA and GBdB are just transposed versions of CEGE, so they are matched. The last bar is not an exact transposition, since EGBG is a minor triad rather than a major triad. Finally, if method is set to quantized contour all bars are matched. The matching algorithm considers major and minor thirds the same. All intervals greater than a third are not distinguished.
Finally if the Levenshtein checkbox is checked, the program would allow one substitution, insertion or deletion error to occur for matches of at least 4 notes. Thus two sequences |CEF GBF| and |CAF GBD| would be accepted as a match.
Search Menu/Match Tune
Frequently the user would like to use an entire tune as a
template. Rather than going through the procedure of cutting
and pasting all the bars in the selected tune into the
Find bars entry box, it is more convenient to run the
Match tune user interface.
This function behaves somewhat similar to Find bars but only
handles a collection of tunes in the active open file corresponding
to the TOC. When the user selects a particular tune in the
TOC the entire tunes acts as the template.
The matching algorithm may be configured using the same menu
used for finding bars; however, certain modes like matching
all bars is not likely to be fruitful.
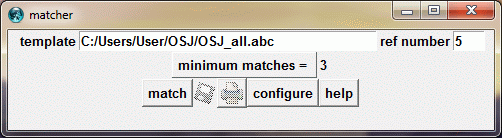 The parameter minimum matches specifies the minimum
number of bars in the template that must match in order for
the matching tune to be displayed. The ref number refers
to the X: reference number of the tune to be used as a template.
The reference number follows the selected tune in the TOC.
The following image shows the output you may see after you click the
match button,
The parameter minimum matches specifies the minimum
number of bars in the template that must match in order for
the matching tune to be displayed. The ref number refers
to the X: reference number of the tune to be used as a template.
The reference number follows the selected tune in the TOC.
The following image shows the output you may see after you click the
match button,
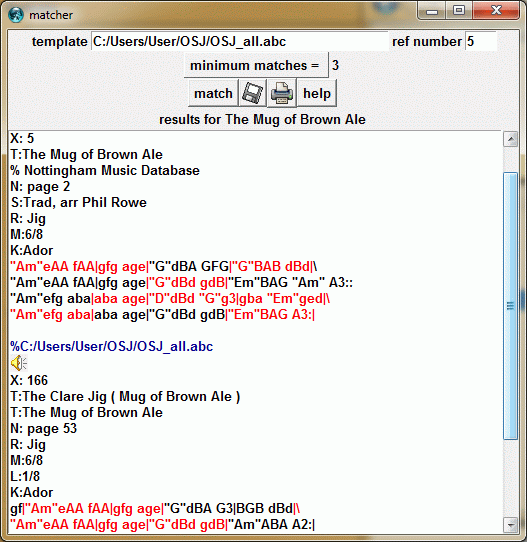
The matching bars in the template and in the tune are shown in red. Clicking the speaker icon allows you to hear the tune played. Clicking the save results button (diskette icon) saves all the tunes in the window to a separate abc file which you specify. You have a choice of saving the abc tunes in regular format, saving it in a form where the matching bars will be displayed in red (see below), or saving it in a form to be pasted into an html document. Since a lot of word processing software can import html documents, this is a convenient way for creating a word document preserving the color information.
Note that the matching algorithm is not exactly symmetrical. Though every measure which matches a measure in the template tune is highlighted in red, the same does not apply to the template tune. Only the first matching measure in the template tune is highlighted in red. Once the matching algorithm, finds a match in the template tune for a given bar, it does not continue to look further.
You may use either abcm2ps or yaps as a PostScript generator for
viewing the results in common music notation; however, in this
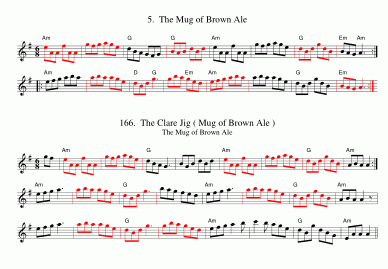 case yaps is recommended. The common measures are accentuated
in red. If you are using abcm2ps, the clefs or music staff may
occasionally be displayed in red. Yaps avoids generating these
artifacts. If you insist on using abcm2ps, it may help
to ensure that abcm2ps displays the music lines the same way
it written in abc format. In other words the scale factor
should be small enough that the music line as written in abc
notation does not run into the next line. Do not
use 'auto line break'.
case yaps is recommended. The common measures are accentuated
in red. If you are using abcm2ps, the clefs or music staff may
occasionally be displayed in red. Yaps avoids generating these
artifacts. If you insist on using abcm2ps, it may help
to ensure that abcm2ps displays the music lines the same way
it written in abc format. In other words the scale factor
should be small enough that the music line as written in abc
notation does not run into the next line. Do not
use 'auto line break'.
An example of an application of this function can be found in the note Abc Similarity.
Search Menu/Grouper
Here is a short video demonstrating the grouper function.
This function applies to a single file composed of a collection
of tunes. The goal of the function is to identify tunes in the
file which are somewhat similar. Presently the program finds
tunes which share common content based on the above bar matcher.
The tunes containing common bars form groups as they are
listed in the following illustration.
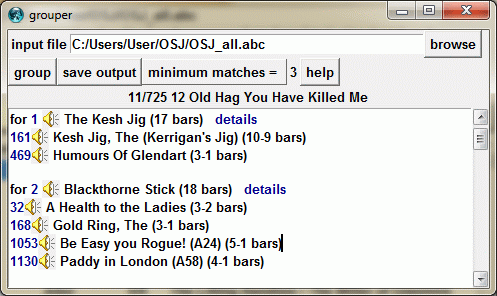 Essentially, the function runs
abcmatch repeatedly on every tune in the file. For each tune, the
entire body of the tune is made a template and compared with
all the tunes in the file. The number of bars in the tune
that are common with the template are presented as a pair separated
by a hyphen. The first number is the number of common bars in the
tune and the second is the number of common bars in the template.
For example, a single bar in the template may appear many times in
the tune being matched.
Essentially, the function runs
abcmatch repeatedly on every tune in the file. For each tune, the
entire body of the tune is made a template and compared with
all the tunes in the file. The number of bars in the tune
that are common with the template are presented as a pair separated
by a hyphen. The first number is the number of common bars in the
tune and the second is the number of common bars in the template.
For example, a single bar in the template may appear many times in
the tune being matched.
To reduce output, you may set the variable minimum matches to a small number greater than one. This specifies the minimum number of common bars in the tune, in order for it to appear in the list.
The button labeled save results allows you to save this output to a separate text file.
If you click on the blue text marked details, then the group of tunes will be displayed in a separate window labeled matcher (the same one used by find bars) and all the matching bars will be highlighted in red. Essentially, the find bars function is run using the selected tune as a template on the active file. The function is not run with the same parameters indicated in the matcher window so the output is not the same that you would get if you clicked on the match button on the matcher window.
Search Menu/Histogram Matcher
This is an extension of the utility Pitch Histogram. If
the pitch histogram has not been computed and displayed for a particular
selection, this is automatically done. The program next attempts
to match the histogram with a database (nmodes.tab) which was generated
from nmodes.abc. Nmodes.abc was derived from a collection of web pages
created by Jack Campin on scales and modes. A more recent version can be
derived from Scales and Modes
in Scottish Traditional Music. The best five matches are
listed in a separate window as shown below
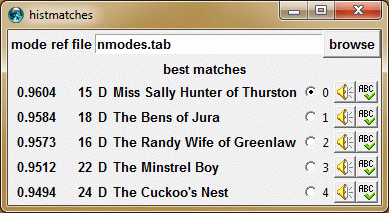 and red vertical lines indicate the corresponding distribution for
the best match in the pitch class distribution.
and red vertical lines indicate the corresponding distribution for
the best match in the pitch class distribution.
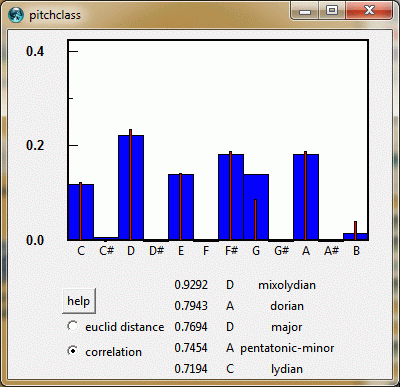 You can view the match for the other for best matches, by clicking
one of the radio buttons. You can hear the tune of one of the matches
by clicking on the adjoining speaker icon. You can view the abc
representation by clicking the adjoining abc icon.
You can view the match for the other for best matches, by clicking
one of the radio buttons. You can hear the tune of one of the matches
by clicking on the adjoining speaker icon. You can view the abc
representation by clicking the adjoining abc icon.
This is an experimental program to familiarize myself with Jack Campin's analysis. So the matching algorithm does not compensate for different key signatures (like pitch histogram). An example of an application of this function can be found in the note Abc Similarity.
You can create your own .tab database from an abc file by browsing and selecting an abc file which contains a collection of tunes. nmodes.abc comes with the runabc.zip distribution or Runabc_setup.exe and if nmodes.tab is not found it is automatically created from nmodes.abc. The nmodes.abc file was recently updated to be in line with John Campin's updated web page. Runabc will check whether the modification date of nmodes.abc is later than modes.tab and recommend that you recreate nmodes.tab if this is true.
There are a number of additional tools such as Midisummary, Piano Roll representation and mftext which help you to deal with problem midi files or to determine what is going on. These tools are integrated with midi2abc, providing a more convenient user interface.
Midi menu
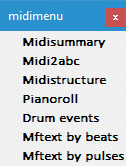
Midi menu/ Midisummary - Structure of the midi file
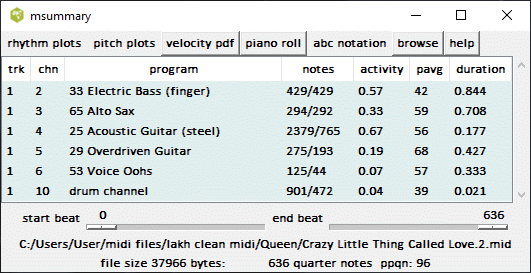
This function presents a listbox containing a list of all track and channels contained in the midi file. The other columns in the listbox provide a statistical description of these channels (tracks). The notes column contains two numbers separated by a slash. The top number is the total number of notes for that channel including any notes associated with the chords. The first number is the number of chords or notes if there are no chords. The activity is a measure combining the number of notes and its duration. It is computed by calculating the total number of pulses that the notes are on divided by the length of the midi file in pulses. Thus a value of one indicates that the channel was playing a note or combination of notes over the entire track. The activity can be larger than one when chords are present, i.e. more than one note is playing at the same time. The column labeled pavg gives the average midi pitch value of the notes that were playing. The midi pitch is given as a number from 1 to 127 where middle C is 60. The average duration of the notes in units of beats is given in the last column.
The top menubar contains numerous useful functions. The browse button allows you to select a different midi file as input. The plot menu buttons, allow you to compute and view the various distributions of the midi file contents that are also accessible from the action menu in the Piano Roll represention described below. The onset distributions and the pitch class distribution may be particularly useful if you are thinking of converting the file to an abc file. Furthermore, if you select (click on) one of the tracks in the listbox, then the plot will reflect only that track. (You can select more than one track and deselect a track if you hold the keyboard control key down while clicking on these tracks.) Though as described below this can be done in some manner in the Piano Roll representation. The piano roll behaves somewhat differently when it is called from here instead of the main menu. When it is called from the main menu, all the tracks and channels are displayed producing a rather messy plot. If you call it from the midisummary window, then only the selected tracks (channels) are plotted. Actually, midisummary creates a temporary copy of the midi file with only the selected tracks (channels) and sends that to the piano window.
Midisummary is integrated with the midi2abc window so that your selected tracks and selected region are passed to the midi2abc window. This allows you to save the effort of typing in the numbers in the midi2abc entry box. The Piano Roll window is also integrated with midi2abc, but the information may not be passed to midi2abc until you take some action like playing the exposed area.
Abc notation
Midi files tend to translate to complex abc notation and require special editors to handle such large files. The editor included here is designed for such files.
For reasons that will soon be apparent, the editor requires that the abc file be formatted in a particular fashion. Each bar occupies a separate line and the voices are not interleaved. When you start the editor,
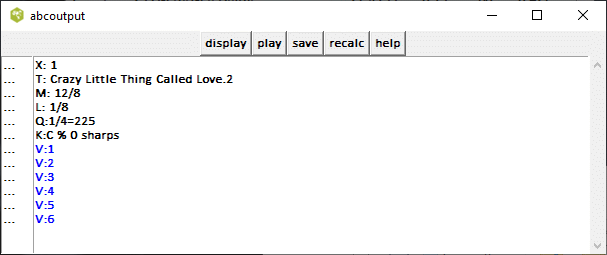
All the voices in blue are elided. Clicking on one of
the voices will expose the content of the voice and the
bar number is indicated in the adjacent frame on the
left. If you edit the file and add another bar (line),
the bar numbers will lose synchronization. Clicking
the recalc will renumber the bars in that voice.
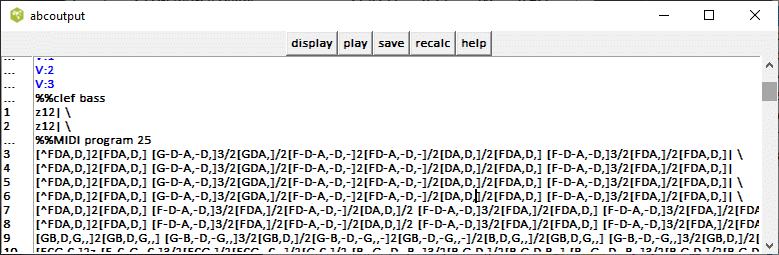
The channel (or track) selections and beat limits in the msummary window are effective. All the midi2abc options described below are also effective except for bars per line. For example, for some files it may be preferable to set minimum rest to 2.
Midi Menu/ midi2abc
It is quite difficult to find multivoiced abc files on the Web. Furthermore the genre of the abc files are fairly limited. Fortunately, you can make your own multivoiced abc files from the many MIDI files on the internet. In most cases the midi2abc tool does this completely automatically; however, a few MIDI files provide a challenge.Besides abc, there are probably 50 or so music notation formats in common use. Many of them are proprietary to a commercial product and there are few applications for converting one format to another. Fortunately all music notation programs usually have provision to export the music in MIDI format. This provides a means of converting the music into abc format. Therefore, a lot of effort has been made in providing a good tool for converting a MIDI file into an abc file. Runabc provides three main tools for handling and viewing MIDI files. They are midi2abc, pianoroll and mftext which are all accessible through the Midi Menu. They shall be described in detail.
The midi2abc executable in the abcMidi package has been expanded to allow the introduction of numerous tools listed above. The midi2abc interface, accessible from Midi Menu/midi2abc is described here.
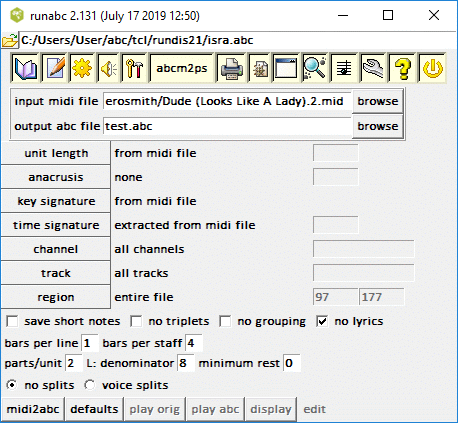
To use it, you first need to select the input midi file using the browse button. You also need to designate the name of an output abc file that will be created. Now click on the lower left hand button midi2abc which will execute the midi2abc.exe program. Once this program is executed, the specified abc file will be created and the play abc will be enabled. You may also click the top console button, to view the messages returned by midi2abc which are sometimes useful. See the sample below.
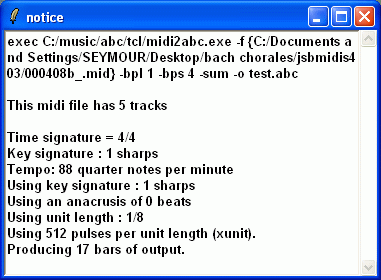
The button at the bottom, play orig will allow you to hear the original MIDI file. If you click on the button play abc, abc2midi will be convert the output abc file back to a MIDI file and send it to a media player program. If you click the next button labeled display at the bottom right of the window, the output abc file will be converted to a postscript file and the postscript viewer will display the results. If you wish to edit the file you will have to change the active file in the top entry box to the output abc file before selecting the editor. Pressing the top play button may produce different results since runabc may change the tempo or introduce other %%MIDI instructions to control the voice assignments which were selected by the user.
In addition you can click on the edit menu button and choose one of the editors. These editors allow you to correct any errors and they may have their own play and display buttons.
For most of the midi files posted on the web you should run midi2abc with the default parameters. These defaults can be restored by clicking the button labeled defaults.
Here is an easy example, you can try. Go to the web site http://www.contemplator.com/tunebook/ and find a MIDI file you like. Download this MIDI file and select this file as the input midi file. Click the midi2abc button and play and display the resulting abc file.
Now if you set this output abc file as you active file (in the top file entry box), you can do many more things with the result. Using the edit/extract part function you can extract a single voice from the multipart score and display it. Now suppose, you wish to play along with the MIDI file on your own musical instrument but you wish to slow it down. The tempo is already indicated in the output abc file, but you can still override it if you go to the Play options/tempo/pitch menu item. Tick the override tempo indications checkbox and it will play with whatever tempo you set. Suppose now you want to turn off some of the instruments. Select Play options/voices and adjust the audio levels of the different voices. Ignore, the program selections as they will not override the current indications in the abc file unless you have indicated that in the Play options/tempo/pitch window. Note after you have finished experimenting, you should remember to restore these settings to their nominal values before you quit or else all abc files will sound funny.
Midi2abc does not perform as well as many commercial notation products and probably requires more work to handle large complex files. For such files it is necessary to work with some subset, by limiting it to specific tracks channels or sections of the music. For some MIDI files especially the raw output of a MIDI keyboard it may be necessary to run midi2abc with different parameters. Though the output abc file converts back to a reasonable MIDI file, it may produce a PostScript file that is almost unreadable. Additional tools are introduced to determine what is happening; but first you need to understand how a midi file is encoded.
Midi File Description
You can see a textual representation of a midi file by running Midi Menu/mftext either by beats or pulses.
A midi file contains a list of events which are mainly note-on and note-off commands. A note-on/off command indicates the relative time from the previous command in units of midi pulses, the particular midi channel, the pitch in midi units and the loudness or velocity. There is a direct mapping between midi pitch units and the keys of a musical instrument so extracting the musical notes is generally simple. The mapping between note duration in midi pulses and note type (quarter note, half note, etc.) may be less straight forward in some cases.
All midi files contain an indication of the number of midi pulses per quarter note, but this may not be relevant for some midi files. If the midi file was created using music notation software, then this indication is probably reliable. On the other hand, if the midi file was recorded directly from a performer playing a musical instrument, there is no guarantee that the player will maintain this mapping exactly or approximately. The duration of a midi pulse in seconds is specified by a tempo command in the midi file. Most midi files have only one tempo command, but some may have many.
There are two types of MIDI files in current practice. The earlier types of file recorded are the MIDI files in one track, where the musical instruments are distinguished by the channel numbers. Newer MIDI files are multitrack, where each instrument is recorded in a separate track. Midi2abc is designed to work on the latter format but it can handle the earlier type to a limited extent.
Midi2abc Options
unit length
For most midi files, the unit length should be determined automatically from the PPQN information (pulses per quarter note) in the midi file. If the note onset distribution looks like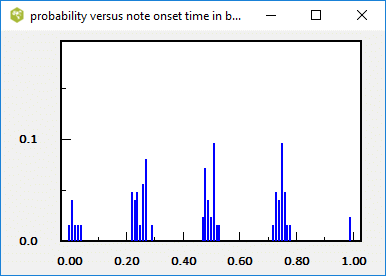
midi2abc should still manage to convert the file. On the other hand if the note onset distribution looks like
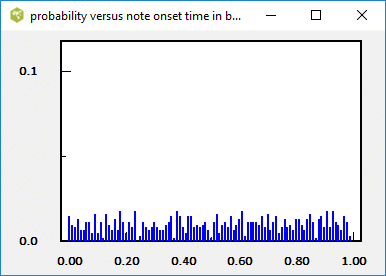
then you have a problem.
In order to create an abc file, midi2abc needs to convert the note durations specified in MIDI pulses to abc units, where called quantum units. By default midi2abc assumes a quantum unit equal to half of the L: unit length which typically is either 1/8 or 1/16 depending on the time signature encoded in the MIDI file. Thus for L:1/8, the quantum unit is a 1/16 th note and midi2abc quantizes all notes to these units. Notes that are shorter than that (after rounding) are typically ignored. The conversion factor from MIDI pulses to quantum units is xunits, can be determined in one of several ways depending upon the run time parameters of midi2abc. By default, midi2abc determines xunits from the header information in the midi file (PPQN or pulses per quarter note). However, midi2abc allows you to specify xunits as a run time parameter, or determine xunits from other information such as the tempo or desired number of measures to output. Furthermore, midi2abc has the capability of estimating xunits statistically by attempting to minimizing the quantization error. (For most music the note durations should be approximately integer multiples of some number of MIDI pulses.)
The first menu button on the abc2midi property sheet, labeled unit length, enables you to select how to determine the unit length. When the program starts up, the method used is "from midi file". If you change this setting to "from entry box", then you must enter a number in the adjoining entry box specifying this length. It is not recommended that you use this method unless you know a priori this conversion or you are doing some fine tuning. For your information, the unit length used by the program is printed out on the summary every time you click the midi2abc button or execute midi2abc.
If you specify "by minimization quantization error", then midi2abc will use its own algorithm for estimating the unit length. The answer is usually correct, but sometimes it is out by exactly a factor of priori this conversion or you are doing some fine tuning. For your information, the unit length used by the program is printed out on the summary every time you click the midi2abc button or execute midi2abc.
If you specify "by minimization quantization error", then midi2abc will use its own algorithm for estimating the unit length. The answer is usually correct, but sometimes it is out by exactly a factor of two or so. If you specify "from tempo in entry box", then the adjacent entry box should contain the estimated number of beats per minute. The program will attempt to use this information to figure out the number of midi pulses in a quarter note and then unit length in order to get this beat. The program assumes the last tempo indication in the file so if the file has more than one tempo indication, this method is not going to work. Finally if you specify "from expected bars in entry box", then you should enter the number of bars or measures you expect in the output abc file. This assumes a constant time signature throughout the file. If the output music notation results is full of tied notes, the program is probably using the wrong unit length.
Anacrusis
A lot of music does not begin with a full bar, but may start with one or more leading notes. This is called anacrusis. This should not be a problem, since this information is usually embedded in the midi file. Nevertheless you may encounter some midi files where it may be necessary to either specify the anacrusis in quantum units, or else tell midi2abc to estimate the anacrusis using one of two algorithms. (One algorithm, attempts to minimize the tied notes across bar lines. The other algorithm searches for strong beats based on the velocity (or loudness) of the MIDI notes. If all the bar lines are off by a couple of beats, you can adjust that using the anacrusis control.
Key Signature
For some reason, many MIDI files do not specify a key signature. This does not affect how the MIDI file is played by the synthesizer, since all the sharps and flats have already been notated in the MIDI file; however, there may be lots of accidentals when you convert the file to abc format. If the key signature is encoded in the MIDI file, midi2abc will use this information in creating the abc file but if it is missing midi2abc will attempt to guess the key signature by minimizing the number of accidentals. Sometimes the key signature indicated in the MIDI file is incorrect and you may wish to use a different one. The next menu button, key signature, provides you with several options. There is a similar menu button for time signature.
Channel Selection
Finally, if the MIDI file contains several instruments encoded in different MIDI channels (0 to 15), you have the option of extracting only a single channel. By default all channels are extracted and the different lines of music (voices) are separated by the track number. Nearly all the recent MIDI files are multitrack format (MIDI format 1)Short rests
Certain percussion instruments are represented in the MIDI file by notes of very short durations. These will be ignored by midi2abc unless you tick the box, save short rests. In that case, all these short notes will be assigned a duration of one quantum unit.
Minimum rests
To improve the articulation of notes, some MIDI music contains
short time gaps between every note. This would appear as many
rests sprinkled between each note in the abc file. The parameter
minimum rest allows you to specify the minimum sized
rest that can appear in the abc file. Rests smaller than that
will be absorbed by the preceding note. For example: when
the minimum rest is set to 0, the music score may look like this.
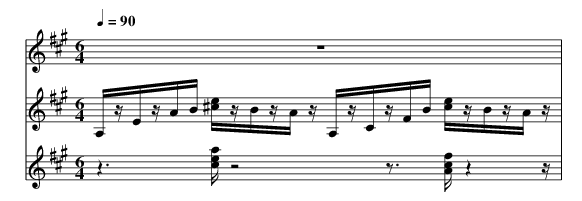
Setting minimum rest to 1, produces something a lot easier to
interpret.
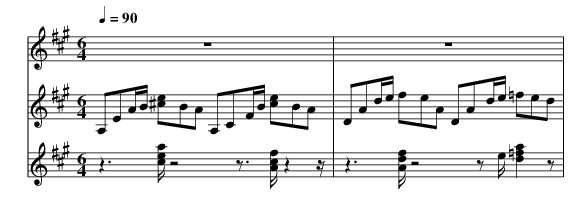
Other Options
If you know the music is not full of triplets and broken notes, then you may wish to tick the check box no triplets .
The music in MIDI files are generally more complex than you typically find in abc files. Furthermore, midi2abc cannot distinguish grace notes from real notes and a trill will expand to a long series of notes. Therefore the output of midi2abc may is usually very complicated and it is recommended that you limit the output to one measure (or bar) per line. (Some software may have difficulty handling lines longer than 128 characters.) Midi2abc will place a backslash continuation at the end the line so that most abc to postscript converters will not print one bar per staff. The entry boxes in this interface allow you to specify both the number of bars per output line, and the number of bars to continue. Enter small numbers in the entry box bars per line and bars per staff.
Lyrics may pose a problems for midi2abc, especially if they are embedded in the same track as the notes. If this is an issue, you should suppress the lyrics until I find a better solution.
New parameters were recently introduced in midi2abc that provide more control on the size of the quantum unit. As mentioned in the beginning of this discussion, midi2abc splits a L: unit length into two parts called quantum units. Now you may specify the number of parts provided it is a power of 2 and not too large. Midi2abc automatically chooses the L: unit length (either 1/8 or 1/16), but now you also have the option of choosing your own unit length provided the denominator is a power of 2. Increasing the quantization precision by raising parts/unit will provide a more accurate representation however this can introduced strange tied notes like 1/4 tied to 3/64 notes which will be hard to sight read. It is recommended that you stick to the default of 2. By convention L:denominator=0 indicates allows midi2abc to choose its own L:unit length.
Nonhomophonic chords or chords containing notes that do not share a common onset time or stop time are occasionally encountered. The abc representation is rather clumsy as illustrated here.
z2 C2- [E2-C2-] [G2E2C2]|z2 C2- [E2-C2-] [G2E2C2]| \
[A2-F2-D2] [A2-F2] A2 z2|[A2-F2-D2] [A2-F2] A2 |

The option voicesplits cleans up this mess by using separate voices.
V: split1A
z2 C6|z4 E4|F4 z4|F4 z4|
V: split1B
z4 E4|z6 G2|D2 z6|A6 z2|
V: split1C
z6 G2|z2 C6|A6 z2|D2 z6|
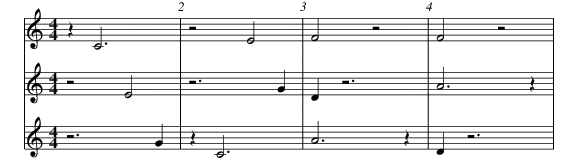
It is possible to use a common staff by inserting the abcm2ps option
%%score (split1A split2B split2C) and changing some
of the rests to invisible rests.
for example
%%score (split1A split1B split1C)
V: split1A
z2 C6|x4 E4|F4 z4|F4 z4|
V: split1B
x4 E4|x6 G2|D2 x6|A6 x2|
V: split1C
x6 G2|z2 C6|A6 x2|D2 x6|
producing

Midi Structure
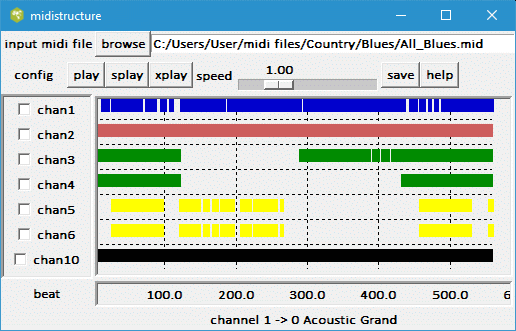 Different voices in the midi file tend
to enter or leave at times when the melody changes in the song. This
diagram plots the position of the notes in each track (or channel)
color coded by the type of musical instrument. For example
the keyboard instruments like the piano and harpsicord are represented
in blue, the electric guitar are shown in orange, the brass instruments
are shown in yellow and etc. The 128 music instruments (MIDI programs)
are grouped into 16 classes. When a group of notes are close together in
time, they will appear as a horizontal bar. The following diagram
shows all the color coded programs.
Different voices in the midi file tend
to enter or leave at times when the melody changes in the song. This
diagram plots the position of the notes in each track (or channel)
color coded by the type of musical instrument. For example
the keyboard instruments like the piano and harpsicord are represented
in blue, the electric guitar are shown in orange, the brass instruments
are shown in yellow and etc. The 128 music instruments (MIDI programs)
are grouped into 16 classes. When a group of notes are close together in
time, they will appear as a horizontal bar. The following diagram
shows all the color coded programs.

Positioning the mouse pointer in one of the bars will cause it to be highlighted in red. A line in the lower part of the plot will indicate the channel number and the mapping to the MIDI program. Like the piano roll, you can designate an area in time for future study by sweeping the mouse pointer inside the diagram while holding the left mouse button down. This is similar to a drag and drop operation. The selected area will be shown with a yellow stipple. Double clicking on a particular spot will clear this designated area. If you click on one of the play buttons on top then only that specific region will be played. You can also select particular channels or tracks using the radio buttons on the left column. If none are selected, then all channels or tracks are assumed.
The three play buttons in the top menu bar, provide different ways of playing the midi file. If specific channels or tracks are checked, then the play button will play the midi file or specified part of the midi file with those channels (tracks) enhanced relative to the other channels. If the splay button is pressed, then only the specified channels will be played. If the xplay button is pressed, then all the channels except for the checked channels will be played. The speed slider allows you to speed up or slow down the music in the playback.
The program actually creates a temporary midi file with a\ random 8 letter name beginning with x containing the desired\ music. This file is automatically deleted during cleanup.\ Clicking the save button allows you to copy this file for\ future analysis and give it a more meaningful name.
Midi menu/ Piano Roll - Piano Roll Representation
Piano Roll is called from the Midi menu represented by musical
note. Assuming you have selected a midi file in the mid2abc window
(described above), pianoroll will generate a new window like the
following example.
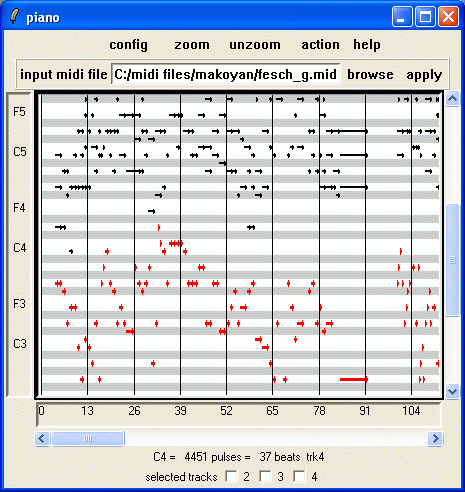
The Piano Roll allows you to visualize a portion of a MIDI file in piano roll form. MIDI files are generally a lot more complicated and longer than abc files. There may be repeats and key signature changes that are not expressed explicitly in the MIDI file. Converting the entire MIDI file into an abc file may produce a big mess requiring much editing. In some cases the output file may not be accepted by other applications and cause it to crash.
Midishow is a MIDI navigation tool built into runabc. It displays the MIDI file in piano roll format in a scrolled Tcl/Tk canvas. Using the scroll and zoom controls, you can select any particular segment of the MIDI file and convert this section into an abc file using midi2abc. Other functions allow you to examine the characteristics of the MIDI file or part of the MIDI file and determine how it was created.
To use this tool, you must have the latest version of midi2abc and a new program midicopy which comes with the abcmidi distribution.
If the MIDI file is very big (say over 100 kbytes) and your computer is slow (say 600Mhz), there may be a long pause before Midishow responds. Runabc will appear to be frozen for that time. Just be patient and the results should appear in about a minute.
Each note is represented by a black horizontal arrow, whose vertical position represents its pitch and whose width represents its duration. If you place the mouse pointer on any particular note, this note and all the other notes belonging to the same track (or channel) are highlighted in red. (Unfortunately, the mouse pointer was removed when I grabbed this window.) A short descriptor of the note is placed in text near the bottom of the window. If you right click the mouse pointer while it is positioned over this note, all the highlighted notes will be put into a temporary MIDI file and sent to your designated MIDI player. If you right click while the mouse pointer is not over any particular note, then all the displayed notes (i.e. all tracks) are played. The piano window is resizeable and you can change the horizontal scale using the zoom and unzoom buttons.
While the music is playing, you may see a vertical red marker attempt to follow along with the music. Unfortunately, the music is played by a separate application which does not communicate with runabc so there may be a loss of synchronization between the movement of the cursor and the music. If the moving marker is annoying, you can turn off this feature by removing the tick mark from the config/follow while playing checkbox. Pressing any key on the keyboard while the piano window is in focus will stop the moving cursor for the current instance.
If you are using TiMidity to play the midi file, TiMidity normally ignores the initial rests at the beginning of the midi file. This poses a problem, if runabc.tcl attempts to follow along with the moving vertical red marker. TiMidity version 2.14 has an option to preserve the initial rest using the option --preserve-silence which you can include in the Options/Player page. (On Linux, I found it necessary to include the option -B2,12 to control the buffering. The option -ik also provides you with a TiMidity user interface.
For finer control, you can select a particular portion of the MIDI file by sweeping the mouse cursor while holding the left mouse button down. The selected area will be highlighted in a light yellow stipple. (Double clicking anywhere in the piano window will remove the highlighted region.) The abcfile button, and right mouse button will now act on only the the highlighted area.
You may configure the program to separate the MIDI file by either tracks or channels. It is recommended that you separate the file into channels rather than tracks. A row of checkbuttons corresponding to the channels or tracks appear at the bottom of the window. If you hover the mouse pointer over one of these checkbuttons, then the program (musical instrument) that was assigned to that channel will be shown for that checkbutton. All the notes associated with that channel will be highlighted in red. (Note that these highlighted notes may not appear in the particular scrolled region that is visible on your screen.) The button labeled 'play selected channels' will play the selected channels (or tracks) for the exposed section of the midi file. If no channels are selected, then all channels will be played.
Action Menu
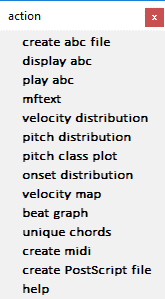
The action menu button brings up a menu of selected actions that you can apply to the displayed region of the MIDI file. Each of the items in the menu will pop up a separate window showing the distribution corresponding to the variable associated with the item. The distribution will apply to only the visible portion of the pianoroll that is displayed. If you have selected a particular channel or track in the checkboxes below, then the distribution will apply only to the checked channels or tracks. If no channels or tracks were checked then the data applying to all the displayed notes is shown. Furthermore as long as these windows are on the screen, the data in the window is dynamic and will change anytime you horizontally scroll the pianoroll data, zoom in, zoom out, or change any of the checked boxes.
create abc file It creates a file called test.abc in the directory runabc_home based on the exposed area and track/channel selection. The midi2abc configuration can be customized using the Midi Menu/midi2abc window.
display abc Displays the music notation of the selected area, (channels or tracks).
play abc Creates the abc file of the exposed section, converts it to a MIDI file and plays it.
mftext Shows the selected portion of the MIDI file in mftext (textual format). This is useful for viewing the MIDI control commands which may colourize the notes. Note that only the selected tracks or channels may be shown and that the track numbers may not correspond to the actual track numbers in the file.
velocity distribution
If you select action/velocity distribution, the program will
analyze the velocity (loudness) indications in the MIDI file
and display a graph of its distribution in a separate window.
The vertical scale is in units of probability.
 The distribution provides some indication of how the MIDI
file was created. If the velocities cover a wide range,
the MIDI file was probably produced using a MIDI instrument
with velocity sensors. If all the notes are restricted to
a few velocity values, then the MIDI file was probably created
using a music notation program. An example is shown below.
The distribution provides some indication of how the MIDI
file was created. If the velocities cover a wide range,
the MIDI file was probably produced using a MIDI instrument
with velocity sensors. If all the notes are restricted to
a few velocity values, then the MIDI file was probably created
using a music notation program. An example is shown below.
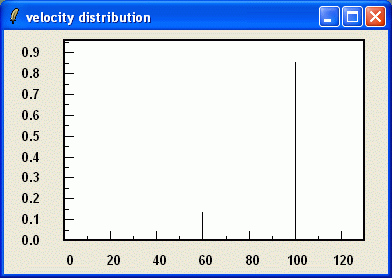
velocity map
If you select action/velocity map, the program will display
the velocity of the notes versus beats corresponding to the
pianoroll display. Each note is a horizontal arrow, but its
elevation now corresponds to its velocity instead of its pitch.
If the music contains many chords of the same velocity,
many of the notes will appear on top of each other. You
can select particular tracks or channels using the selection
menu in the pianoroll window. If you scroll or zoom, in the
pianoroll window you should update the plot by calling this
action item again.
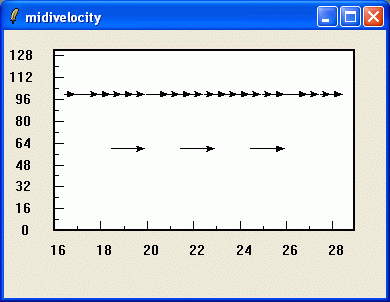
pitch distribution
If you select action/pitch distribution, you get two graphs.
The first plot is the distribution of all pitches in the
the exposed region of the MIDI file. This plot gives you
an idea of the range of notes.
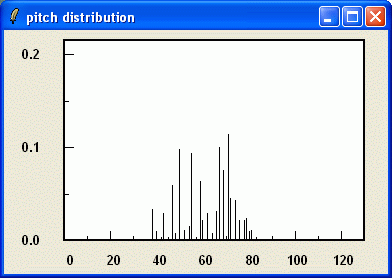
pitch class distribution The plot shows the distribution of pitch classes. This is useful for guessing the likely key signature of the music. Many MIDI files do not specify the key signature. By observing which keys are absent and which one is the most common, one can frequently infer the musics key signature. In the following plot, the key of G is most common and the key of F# occurs instead of F. This suggests the key of exposed section is G major.
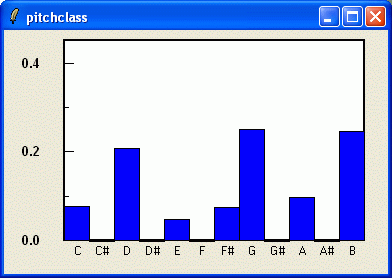
notegram This plot shows how the pitch classes are distributed in time. This reveals key changes (Eb to Bb and back) as is evident in the song Affirmation by Savage Garden.

chordgram
The chordgram was found to be a valuable visualization tool in my program midiexplorer. It was therefore added to runabc where it can also be used to analyze abc music notation,
The chordal accompaniment
in the MIDI file provides a backing to the melody and provides a structure
to the music. Identify the root and type of chord is not a exact science
due to the difficulty of distinguishing the nonchordal tones (eg. passing
notes). A discussion on the process of identifying the chords can be
found in the thesis,Computational Chord-Root Identification in Symbolic Musical Data: Rationale, Methods and Applications which was published
in Tonal Theory for the Digital Age pages 99-119. The paper
is available as a pdf file from the web site
http://www.ccarh.org/publications/books/cm/.
Once the root was determined, the type of chord was determined by looking
at the spacing (number of semitones) between the pitches of the notes and
the root. Presently, the program does not consider chords with more
than 3 notes (e.g. 7ths, 9ths) and inversions. According to
Sapp, the root finding algorithm has a 90 percent accuracy.
onset distribution
This plot shows the normalized histogram of the note onset time inside
a midi beat. Typically a midi beat is a quarter note and is assumed to
map into a unit length. If there are two eigth notes in a beat,
the first note would likely occur at time 0.0 inside the beat
and the second note would occur at time 0.5 inside the beat. The proportion
of notes occurring at these fractions of time in the beat are plotted.

note duration distribution
This plot shows the normalized histogram of the note durations in
beat units. Thus a half note would occupy two beats. All notes
longer than 2 and 2/3 beats are grouped together in this plot.
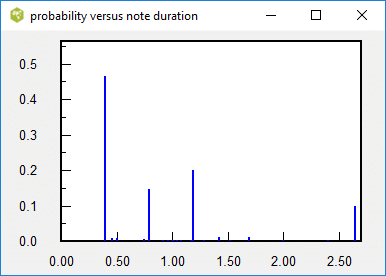
Humans playing midi instruments do not play the notes in exact
musical durations introducing a bit of jitter.
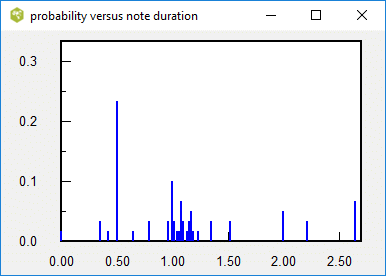
beat graph
The beat graph is a useful but complicated representation to describe.
It plots the position of the onset time of a note in a beat versus
its beat number for all the selected notes. If you look at the mftext
output displayed by runabc, note onset times are represented by beat
number, where a beat is usually a quarter note. This is more informative,
than displaying the MIDI pulse number. The relationship between MIDI
pulses and quarter notes is given by the PPQN parameter (pulses per
quarter note) which appears in the header of the MIDI file. If the
MIDI file was produced by a music notation program, the onset times
of the notes follow musical standards at occur at exact fractions
of a beat. So the beat numbers of a note are generally numbers like,
10.250, 12.000, 13.50 etc. rather than 10.158, 12.012, 13.683 etc.
The beat graph plots the fraction of a beat versus the beat number
so for previous onset times the points (10, 0.250), (12, 0.000) and
(13.0 0.500) would be plotted. The following plot is an example
of a beat graph for a MIDI file produced by a music notation program.

Note the points generally align along horizontal lines. If there
are no notes smaller than a quarter note, then the horizontal line
will be along the zero axis.
Creating a MIDI file using a music notation program is very slow.
MIDI files are also created in real time while the musician is
playing a MIDI keyboard. Often the musician plays the music a little
fast or a little slow so that all the beats are a little shorter
or longer than the nominal value indicated by the PPQN. The
following figure shows the beat graph for such a file.
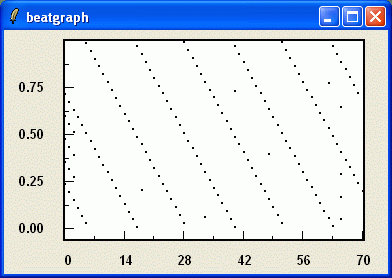 Since the beat positions seem to occur earlier in each subsequent
frames (the points are sloping downwards), it appears that the nominal
PPQN is a bit too large. If midi2abc produced a abc file using
the value in the MIDI file, there will be lots of tied notes.
(In this case, midi2abc should estimate the unit length by minimizing
the quantization error and you may probably have to introduce an
anacrusis value.)
Since the beat positions seem to occur earlier in each subsequent
frames (the points are sloping downwards), it appears that the nominal
PPQN is a bit too large. If midi2abc produced a abc file using
the value in the MIDI file, there will be lots of tied notes.
(In this case, midi2abc should estimate the unit length by minimizing
the quantization error and you may probably have to introduce an
anacrusis value.)
You may also see a beat graph which looks like this.
 The PPQN is probably correct, but the notes have not been quantized to
musical intervals. The midi2abc output may need considerable editing.
The PPQN is probably correct, but the notes have not been quantized to
musical intervals. The midi2abc output may need considerable editing.
The beat graph is not my original idea, but was first introduced by Van Belle Werner (http://bio6.itek.norut.no/werner/Papers/bpm04/). I adapted it to a MIDI file.
Midishow indicates quarter note beat positions with vertical
lines based on the ppqn variable in the MIDI file. (To avoid
cluttering the screen they are decimated until you zoom into
a specific area.) For some MIDI files, the ppqn has an incorrect
as discussed above. You can temporarily change the ppqn and the
spacing of the quarter beat indications by going to the
config/ppqn adjustment menu item on the top left.
The following window should pop
up.
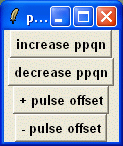
Clicking on the button increase ppqn or decrease ppqn
will increment or decrement the ppqn and increase or decrease the
spacing between the quarter note vertical lines. Clicking either
the button + pulse offset or - pulse offset will not
change the spacing but merely shift the quarter note lines to the
left or right. If you hold down any of these buttons for more than
a half a second, the appropriate action will be automatically repeated
about 20 times a second.
To illustrate the usefulness of this feature, you need to download
Scarlatti's Sonatas from John Sankey's MIDI site.
http://www.johnsankey.ca/harpsichord.html
These MIDI files are difficult to convert to music notation for several
reasons. The ppqn indication is frequently incorrect and there is
no time signature meta commands. (In addition each note class is
in a different MIDI channel to allow pitchbending to the desired
temperament.) If you run pianoroll on one of these files (eg. K019.MID
which is in 2/4 time) you will find that the quarter note lines do
not line up with the notes since the file assumes a ppqn of 192.
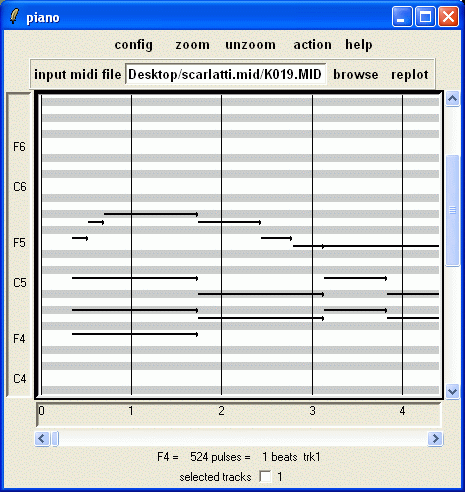 By adjusting the ppqn, you can get something like this.
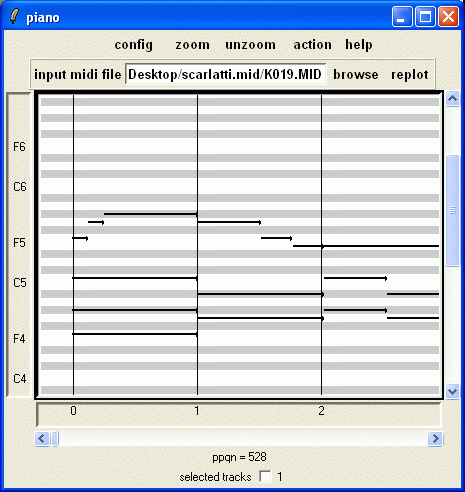
Note the ppqn value of 528 listed at the bottom of this window.
Midi2abc is unable to infer correct unit length even when using
the -gu option. However, you can tell it to use the value of
264 (for a 1/8 note unit length) (i.e. use options -u 264 -m 2/4 -aul 8)
and get something resembling the printed score.
You can also use the beatgraph output to infer the ppqn. If the lines are going up, you need to increase the ppqn. (The lines become flat when ppqn is 536. You need to request a new beatgraph output whenever you change the ppqn.)
As a convenience, the actions create abc file, play abc and display abc will migrate your ppqn parameters to the midi2abc options whenever the ppqn window is displayed.
If you are preparing a paper, you may need a copy of the displayed piano roll as a PostScript file. Click the button action/Create PostScript file to produce a file called piano.ps.
The analysis of chords is a challenging problem in musicology.
Another action feature unique chords (which may be of questionable
value) creates a textual histogram of all chords in the exposed portion
of the MIDI file. This is presented as a table in a separate window
illustrated below.
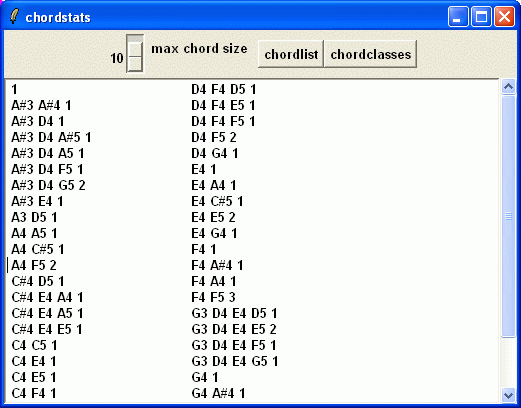 The chords were creating by from all coincident notes after combining
all tracks. Provided the chord last for more than 0.2 beats it is
included in the table. The chords are generated starting from the
lowest note and going up in pitch. The maximum number of notes
in the chord may be altered using the scale widget. The table
lists the chord's notes and the number of times this chord was
encountered in the exposed section of the MIDI file. Pressing,
the chordlist button regenerates the table. The chordclasses
computes the chords from pitch classes only. (In other words octave
position is ignored.)
The chords were creating by from all coincident notes after combining
all tracks. Provided the chord last for more than 0.2 beats it is
included in the table. The chords are generated starting from the
lowest note and going up in pitch. The maximum number of notes
in the chord may be altered using the scale widget. The table
lists the chord's notes and the number of times this chord was
encountered in the exposed section of the MIDI file. Pressing,
the chordlist button regenerates the table. The chordclasses
computes the chords from pitch classes only. (In other words octave
position is ignored.)
Pgram
This tool provides an alternative way for visualizing the contents of a midi file. This tool is only accessible from the top bar of the midisummary window. It presents a compact piano roll representation where the notes are color encoded by the type of musical instrument (midi program).
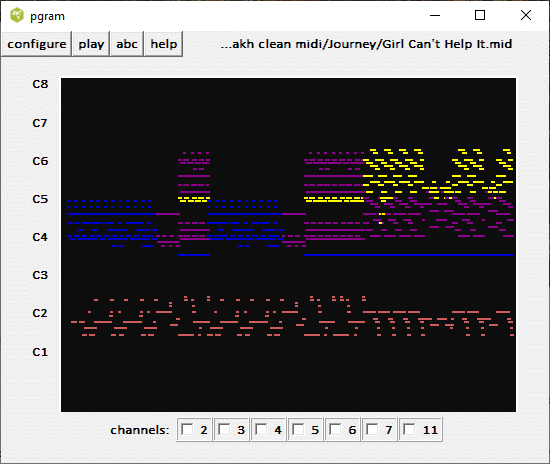
Like other plots, the notes are sensitive to the mouse pointer. If the mouse pointer overlays one of the notes, all other notes belonging to the same midi channel are highlighted and a status bar indicates the channel number and the midi program name. You can select channels of interest by ticking the checkboxes below. You can select a time span of interest by sweeping the mouse pointer from left to right while holding the left mouse button down. The play and abc buttons will act on those selections.
Midi menu / drum events - Drum roll representation
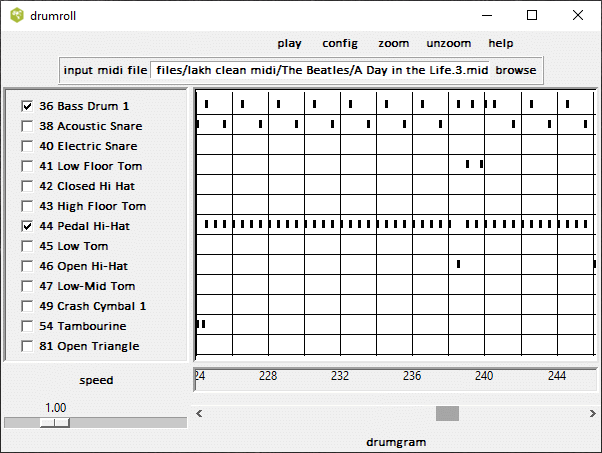
This interface is designed to view and play selected percussion events in the midi file. When you start this function, an overview of the entire file is presented. Select a time interval of interest and zoom into this region to see the details as shown above. A sequence of checkboxes on the left allow you to select the percussion instruments to be played when you click on the play button. If no instruments are checked then all instruments are played. The speed slider allows you to increase or decrease the tempo. When you click the play button, the tempo commands in the midi file are adjusted prior to playing the temporary midi file.
The config button allows you to determine whether the percussion
channel is played alone, with the other channels or not at all.
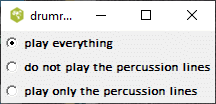
Midi menu/ Mftext - Textual Representation of a MIDI file
Clicking midi menu/mftext will display a window similar to above showing a textual representation of a MIDI file. In order for this to work you need the latest version of midi2abc (2.80 or higher). The output is somewhat similar to mftext. Time is indicated in beat units. The channel number is usually indicated after the MIDI command.
The checkbuttons on the bottom allow you to elide specified tracks or specified MIDI commands. For example in the above sample, all the MIDI commands in track 2 were hidden. This is useful when you are viewing a fairly complex MIDI file. If you are eliding a mixture of tracks and MIDI commands, tcl/tk may get confused and not elide some of the commands correctly. I do not know how to fix this problem.
Quiting
Whenever you exit from runabc.tcl by clicking on the x on the top right corner of the window (assuming Windows 95/NT), the program creates or updates a file called runabc.ini. This is an ascii file containing all of your settings allowing the program to resume the next time you run it.

Return to top level to download runabc.zip and read the install.html page.
Musicxml support
Musicxml files have become a standard for exchanging digital sheet music and there are more than 3 million scores that can be found on the musescore website. Wim Vree has created a Python scripts xml2abc and a similar script to go in the opposite direction. Support of these functions are being added to runabc in a new menu on the top.You can find a collection of musicxml files on the site MuseTrainer public domain MusicXML library web site. If you are looking for a larger collection see PDMX: A Large-Scale Public Domain MusicXML Dataset for Symbolic Music Processing; however, you need some programming skills to deal with this collection.
In order to use these new functions you will need to download the python scripts from https://wim.vree.org/svgParse/ and add paths to these files in the abc executables page. Except for the Windows PC operating system, you will also need to install a Python interpreter which you can get from https://www.python.org/downloads/. On Windows PC, there is an option to get Windows executables which already include the Python environment. These executables run somewhat slower so I prefer to install Python and run the python scripts.
If you click on the menu item xml/abc2xml the following
windows should appear.
If you click on the menu item xml/xml2abc the following
windows should appear.
Both of these functions create an abc file or an xml file from the given input. If you wish to keep these files, you will need to specify the folders where you want to save these files.
Appendix
Installation
Installation is now a lot easier than before. If you are using the Microsoft Windows platform (XP, Vista, 7 and etc.), download and execute Runabc_2011*_setup.exe which will not only install runabc.exe but also the required support executables in abcMIDI. On other platforms, you will need the source code runabc.tcl and the tcl/tk 8.5 interpreter. Runabc.tcl should work with tcl/tk 8.6, however you may need to change wish8.5 to wish8.6 in the 5th line of the runabc.tcl source code. SumatraPDF and ghostview discussed below are now optional provided you have an internet browser and use abcm2ps to create a xhtml or svg file instead of a postscript file. If you wish to use yaps or abc2ps or other converters then you will need ghostview and SumatraPDF discussed below. The rest of this discussion will assume that you are starting with the source code.
Runabc.tcl is a tcl/tk script which requires a Tcl/Tk environment. To execute runabc.tcl you should have Tcl/Tk 8.5 which you can find at http://www.activestate.com/activetcl. Select the package appropriate for your system and install it. The package without the source code is somewhat over 9 Mbytes on my computer.
If you do not wish to install Tcl/Tk 8.5 there is still another alternative. You can execute runabc.kit which will run on any system where tclkit has been installed. Tclkit has been ported to almost every system and is about 1 megabyte. You can get tclkit from http://code.google.com/p/tclkit/ This may be the preferable approach, if you have an older version of Tcl/Tk on your system and you do not feel comfortable building a new version from source. The link how to get started tells you how to setup tclkit on your system. (For Microsoft Windows, you should also associate the .kit extension with tclkit.)
Runabc.tcl should be installed in a folder which has read/write/execution access. Runabc.tcl will create a file runabc.ini which saves the user's settings and states. A folder tmp/ for transferring information to the other executables is also created. If more than one user is using runabc.tcl on a system, each user should have a personal copy of runabc.tcl in their home directory.
Note that even if you are only running runabc.kit or runabc.exe, you may wish to download runabc.zip and unpack it. Besides runabc.tcl, it contains other useful stuff, such as an icon (runabc.ico), *.fmt files for abc*2ps, sample abc files and a description of the latest updates in runhistory.txt. Note that all the files including runabc.tcl are text files which can be viewed with any editor.
You also need the James Allwrights's abcMIDI package consisting of abc2midi, yaps, abc2abc and other programs. James Allwright is no longer supporting this package and I have made numerous fixes as well as added new features. Executables for the package are available for some platforms; otherwise you will need to build them yourself from the source code.
You can find the latest abcMIDI sources of abcMIDI from my main page http://ifdo.ca/~seymour/runabc/top.html and compile it on your system. Executables for Microsoft Windows can also be found on the same site. Other precompiled versions systems are available on Guido Gonzato's site The abcplus Homepage.
To convert the abc files to postscript files displaying the sheet music, you also need Jeff Moine's abcm2ps package. The executable for the PC is included with abcMIDI executables on my site.
A MIDI player is also handy. They usually come with the operating system or sound card. If you have the capability of playing audio files but no MIDI capability, you could download the TiMidity package. Free SoundFont patches for Timidity may be obtained from Big Soundfont You can find links to other free soundfonts on the web page http://coolsoft.altervista.org/en/virtualmidisynth
Finally you need a Postscript viewer. For Microsoft Windows, I recommend SumatraPDF which is entirely free. You can get it from sumatrapdf. (Sumatra is available from many other sites like CNET if the above link is too slow.) SumatraPDF is actually a pdf file viewer; however, if you also install Ghostview SumatraPDF will also be able to display PostScript files. (This is an undocumented feature.) The Ghostview package with all its fonts is about 6 Megabytes. For Microsoft Windows, you should download the latest version (eg gs902w32.exe). If SumatraPDF returns a message that it cannot read Out.ps, this implies that it could not find the Ghostview package which should be in the Program Files/gs directory. Alternative PostScript viewers that you can use are gsview or Acrobat. However, each time gsview is started it will ask you pay a $40.00 registration fee.
On Linux, I prefer to use the PostScript viewer called Evince.
You can find many other software packages and abc notated files from Chris Walshaw's, The abc Homepage.
Return to top level to download runabc.zip.